You would think modifying a GitLab repository from its CI job should be straightforward. Well, it's not. Here's how I did it.
Quickstart
- Create a personal or project access token with
write_repositoryaccess. - Add it as a
maskedvariable (GIT_PUSH_TOKEN) in the project's CI/CD pipeline. - Modify the repository, preferably in a separate branch (
BRANCH_NAME). - Use the token to push your changes.
git push -o ci.skip "https://whatever:${GIT_PUSH_TOKEN}@${CI_REPOSITORY_URL#*@}" $BRANCH_NAME
Fork this repository and push something to the main branch. Then look at the
test branch to see a new file.
I learned from these two examples:
- https://gitlab.com/taleodor/sample-helm-cd/-/blob/master/.gitlab-ci.yml
- https://gitlab.com/guided-explorations/gitlab-ci-yml-tips-tricks-and-hacks/commit-to-repos-during-ci/commit-to-repos-during-ci/-/blob/master/.gitlab-ci.yml
Building a Simple Example
I will create some new files and add them to a different branch. Create an empty repository in GitLab (free tier is fine).
This blog assumes you have a basic understanding of GitLab jobs. Otherwise, please start at https://docs.gitlab.com/ee/ci/index.html.
Authentication Tokens
Jobs have auto-generated tokens but these tokens do not have write access to
the parent repository. We can access them via CI_JOB_TOKEN. While
the documentation mentions it "has the same permissions to
access the API as the user that executes the job", they cannot modify the repo.
We need to create a new access token. There are multiple types of access
tokens depending on your GitLab installation. In the GitLab free tier, we can
create personal access tokens but it's also possible to create them for a group.
If you can, create project access tokens. These are tied to a specific project.
Creating a Personal Access Token
- Go to https://gitlab.com/-/profile/personal_access_tokens and create a new token.
Token name: I chosegitlab-job-access-token.Expiration date: Choose an expiration date or leave it empty.Select a role: Select a role that can modify the repository likedeveloperormaintainer.Select scopes:write_repository.- Make sure it's not
write_registry.
- Make sure it's not
- Click
Create project access token. - Copy the access token.
Creating a Project Access Token
Project access tokens are better but not available in the free tier. To create
them go to the project on GitLab.com and then Access Tokens. Then,
follow the rest of the steps in the previous section.
As we can see in the docs, creating a project access token will create and add a service account to the project. Don't worry if you pay per seat, you will not get billed for it.
Alternate Git Authentication with SSH Keys
We can also interact with the repository with SSH.The workflow is very similar to a normal command-line push.
- Create an SSH key pair.
- Add the public key to the target repository.
- On GitLab.com it's at
Project > Settings > Repository > Deploy Keys.
- On GitLab.com it's at
- Add the private to the project as a CI/CD variable. E.g.,
SSH_PRIVATE_KEY.- Check
Mask variable.
- Check
- Now you can use
$SSH_PRIVATE_KEYin your runner.
A good example that uses this method to modify the current repository:
Using Secrets in the Pipeline
These tokens should not be hardcoded in the repository (and mainly
.gitlab-ci.yml file) for obvious reasons. I am going to use them as a CI/CD
variable. We also have other options like
pulling them from a "secrets vault"
(e.g., Hashicorp Vault).
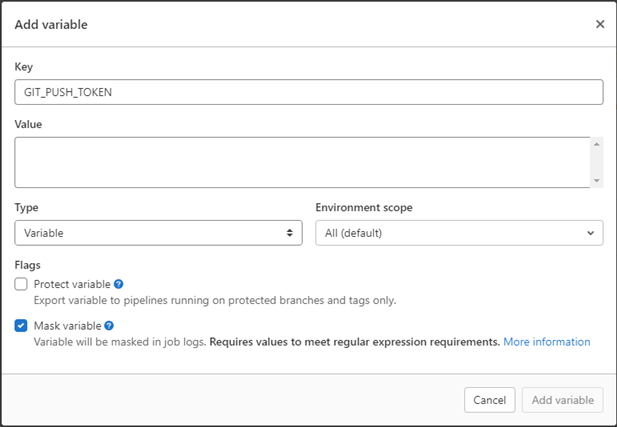
In the project (this is also possible for groups), go to Settings > CI/CD,
then expand the Variables section. Add a new variable.
- Key:
GIT_PUSH_TOKEN - Value: Paste the access token.
- Flags: Only check
Mask variable.- This is important. We do not want the token to appear in the logs.
Docs: https://docs.gitlab.com/ee/ci/variables/index.html#add-a-cicd-variable-to-a-project.
 Adding a new CI/CD variable to the project
Using the Access Tokens
We can interact with the GitLab API with this access token (see more in the end) or use it directly in git commands (used here).
The following command uses the access token to modify the repository. Note the
access token (GIT_PUSH_TOKEN) and other environment variables.
git push -o ci.skip "https://whatever:${GIT_PUSH_TOKEN}@${CI_REPOSITORY_URL#*@}" $BRANCH_NAME
For my project I have:
git push -o ci.skip 'https://whatever:[MASKED]@gitlab.com/parsiya/gitlab-job-modify.git' test
-o ci.skip tells the server to not trigger any jobs with this change
(git -o documentation). We do not want to start an infinite series
of jobs.
The whatever string in the URL can be anything. The username is not checked.
This is intended behavior for project access tokens according to the
documentation:
If you are asked for a username when authenticating over HTTPS, you can use any non-empty value because only the token is needed.
Currently, personal access tokens do not need the username either, but it's a bug:
Though required, GitLab usernames are ignored when authenticating with a personal access token. There is an issue for tracking to make GitLab use the username.
- More information: https://docs.gitlab.com/ee/ci/variables/
- Predefined CI/CD variables available in the pipeline: https://docs.gitlab.com/ee/ci/variables/predefined_variables.html
Test Run
We have created the access token and learned how to use it. It's time to try it out.
The Objective
I want to create a new file in the pipeline and commit it to the test branch.
Setting Up the Repository
Create an empty repository in GitLab. Create a local branch named test and
push it.
gitlab-job-modify$ ls
README.md

gitlab-job-modify$ git checkout -b test
Switched to a new branch 'test'

gitlab-job-modify$ rm -rf README.md

gitlab-job-modify$ git add .

gitlab-job-modify$ git commit -m "remove README"
[test d352267] remove README
 1 file changed, 3 deletions(-)
 delete mode 100644 README.md

gitlab-job-modify$ git push origin test
Creating the Pipeline
The GitLab CI/CD jobs are defined in .gitlab-ci.yml in the root
of the repository. Switch back to the main branch and create this file.
First, some extra variables.
variables:
  GIT_DEPTH: 1                               # Create a shallow copy
  BRANCH_NAME: "test"                        # Name of the branch to modify
  BOT_NAME: "GitLab Runner Bot"              # Bot's name that appears in the commit log
  BOT_EMAIL: "gitlab-runner-bot@example.net" # Bot's email, not important
  COMMIT_MESSAGE: "Commit from runner "      # Part of the commit message
Next, an internal script to create a new file. CI_COMMIT_SHA is the hash of
the last commit.
# create a file named after the last commit's hash.
.modify: &modify |
  echo "CI_JOB_ID: ${CI_JOB_ID}" > $CI_COMMIT_SHA.txt
This script checks for changes (using git status) and if so, commits and
pushes the changes to the test branch.
# push the repository
# based on https://gitlab.com/taleodor/sample-helm-cd/-/blob/master/.gitlab-ci.yml
.push: &push |
  git status
  lines=$(git status -s | wc -l)
  if [ $lines -gt 0 ];then
    echo "committing"
    git config --global user.name "${BOT_NAME}"
    git config --global user.email "${BOT_EMAIL}"
    git add .
    git commit -m "${COMMIT_MESSAGE} ${CI_RUNNER_ID}"
    echo "git push -o ci.skip 'https://whatever:${GIT_PUSH_TOKEN}@${CI_REPOSITORY_URL#*@}' ${BRANCH_NAME}"
    git push -o ci.skip "https://whatever:${GIT_PUSH_TOKEN}@${CI_REPOSITORY_URL#*@}" $BRANCH_NAME
  else
    echo "no change, nothing to commit"
  fi
Finally, in before_script we do some setup.
modify-repo:
  image: alpine:latest
  before_script:
    - apk add bash git          # add bash and git (probably not needed)
    - git fetch
    - git checkout $BRANCH_NAME # checkout the test branch
    - cd $CI_PROJECT_DIR        # go into the repo
  script:
    - *modify                   # run the modify script and create the file
    - *push                     # run the push script and push the changes
Note that I have not set any conditions for this job. It will run for every change. https://docs.gitlab.com/ee/ci/jobs/job_control.html.
Let's commit this file and see what happens.
Checking Job Executions
This creates a new job. We can see it at
https://gitlab.com/parsiya/gitlab-job-modify/-/jobs/ or
project on GitLab.com > CI/CD (side bar) > Jobs.
 New job created
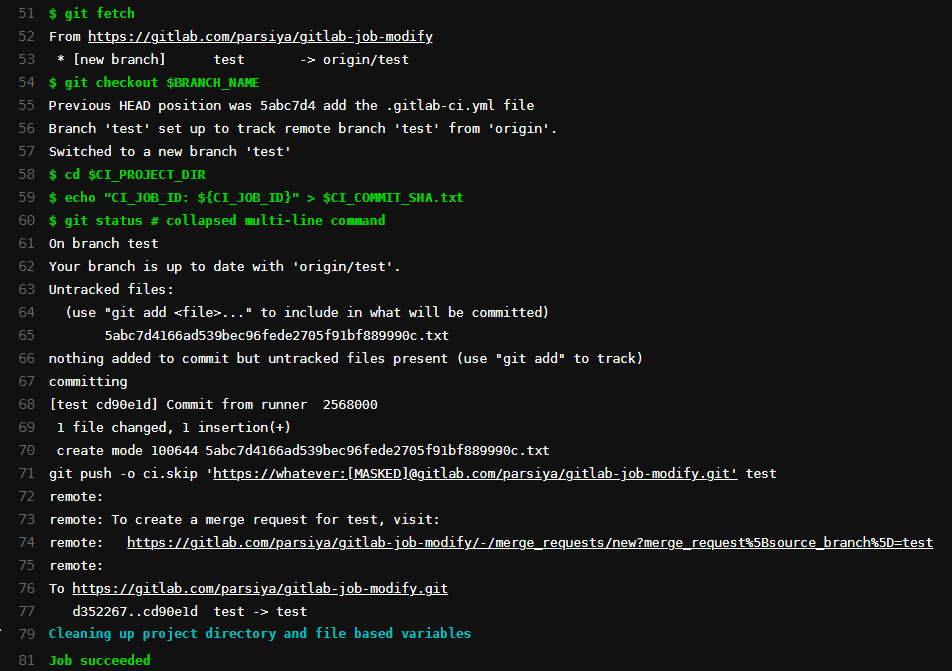
Click on Running (or passed/failed) to see the logs.
 Execution logs
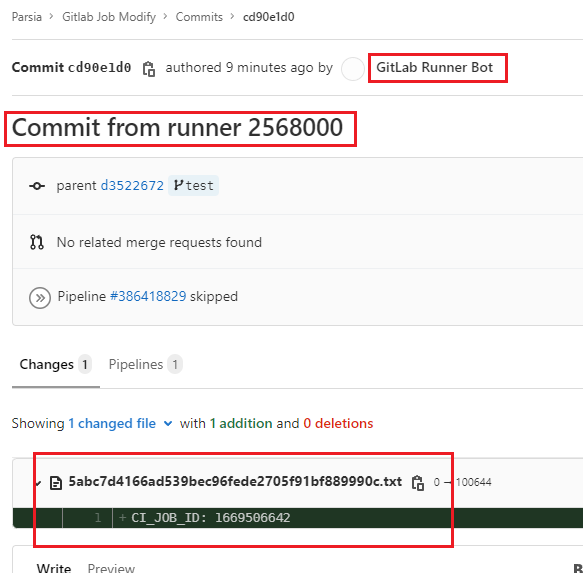
The test branch should have the new file. Also, see how the bot's name appears
in the commit. If we had a project access token we could have used the
associated bot account here and link the commit to a real GitLab account.
 The commit
A Bug in the Code
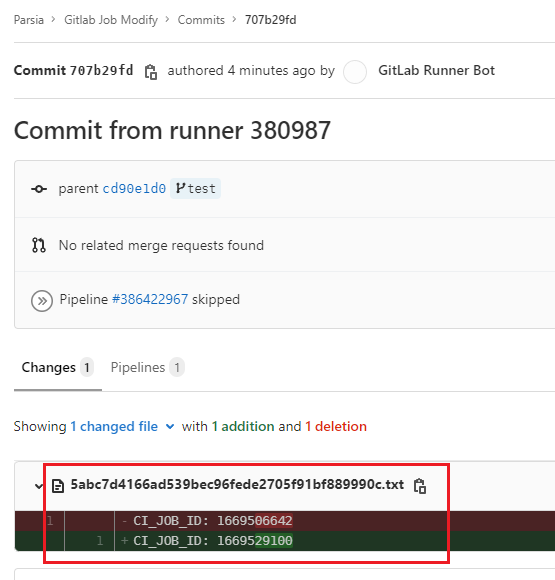
We can re-run a job using the website (or APIs) to discover a bug in our code. I decided to keep it to discuss it as one of the pitfalls.
 New job
Running the job via the website without modifying main overwrites the
file. The modify script uses the last commit's SHA to name the file. We are
running the pipeline in the main branch which has not changed.
# create a file named after the last commit's hash.
.modify: &modify |
  echo "CI_JOB_ID: ${CI_JOB_ID}" > $CI_COMMIT_SHA.txt
We can name the file after CI_JOB_ID because it will be different in every
run or any other unique value.
Troubleshooting
I spent a few hours trying to get this to work. Writing down the issues so you save some time:
- The access token's role should be
DeveloperorMaintainer(or a custom role that can modify the repository). It doesn't matter if your token has write access, it will fail if you are using a role likeGuest. - Don't push to a protected channel like
main. Choose a separate branch. - Use
-o ci.skipin thegit pushcommand to prevent the job from running itself again, forever. - It doesn't matter what name you are using in the
git pushcommand instead of${BOT_NAME}. This will appear in the commit. - Do a
git fetchbeforegit checkout. - Make sure the access token has
write_repositoryand notwrite_registry.
What did We Learn Here Today?
We can modify a repository from its job. This is a good building block for a couple of (hopefully) great projects in my pipeline. This is also useful for interaction with other repositories.
Future Work
This example is a proof of concept. In the real world, I want to do some fancy
analysis in the modify script with a proper programming
language (e.g., Go or Python). We can use the GitLab
API to make changes instead of the git push and/or use a git library to modify
the repository instead of naked git commands.
For example, we can use the tokens in the GitLab API. E.g., in the
PRIVATE-TOKEN HTTP header or as a parameter. See
https://docs.gitlab.com/ee/api/index.html.
We can also use a REST API to create files or modify a repository. The API is also useful if you want to modify a separate GitLab repository from without dealing with SSH keys.
For more information see https://docs.gitlab.com/ee/api/repository_files.html#create-new-file-in-repository.