Hackerman's Hacking Tutorials

The knowledge of anything, since all things have causes, is not acquired or complete unless it is known by its causes. - Avicenna

Nov 4, 2019 - 12 minute read - Comments - Burp Burp extension

Swing in Python Burp Extensions - Part 1

TL;DR: What I learned from creating handcrafted GUIs for Python Burp extensions using Swing. Code is at:

The State of the GUI

In April 2019, I had just joined Electronic Arts and I wanted to make a Burp extension. I saw only tutorials on creating a GUI in Jython.

Looks like everyone is either using Java or handcrafted Jython Swing GUIs. I mostly learned it by reading the source of extensions and found this tutorial by Jake Miller A.K.A. Laconic Wolf:

This training by Doyensec is good but not for what I wanted to learn (GUI design). As I mentioned in the tweets, the Python GUI is just modified from a NetBeans generated GUI:

This is something I want to explore later. But to be able to translate the code and do modifications, I needed to figure out how things work internally.

In my blog post [Cryptography in Python Burp Extensions] (/blog/2018-12-24-cryptography-in-python-burp-extensions/#using-jython "Cryptography in Python Burp Extensions"), I started using Jython classes in my Burp extensions and realized I can do the same with Swing (which is what everyone does).

I am documenting what I learned first for my future-self and then for everyone else who wants to take the same path.

Prerequisites

This tutorial assumes you know:

  1. How to search.
    1. When in doubt, search for Java and Jython Swing tutorials.
  2. How to setup Jython in Burp.
  3. How to use Jython classes.
  4. How to program in Python.
  5. How to setup https://github.com/securityMB/burp-exceptions.

Jython Swing Experiments

Basic Tab

To add a tab to Burp, we need to extend and implement the ITab interface.

01-tab-skeleton.py
 1
 2
 3
 4
 5
 6
 7
 8
 9
10
11
12
13
14
15
16
# implement ITab
# https://portswigger.net/burp/extender/api/burp/ITab.html
# two methods must be implemented.

def getTabCaption(self):
    """Burp uses this method to obtain the caption that should appear on the
    custom tab when it is displayed. Returns a string with the tab name.
    """
    return "Example Tab"

def getUiComponent(self):
    """Burp uses this method to obtain the component that should be used as
    the contents of the custom tab when it is displayed.
    Returns a awt.Component.
    """
    # GUI happens here
  • getTabCaption just returns the name of the tab.
  • getUiComponent returns the new tab.

This extension will not work because getUiComponent is returning nothing and we get a NullPointerException error. Edit the skeleton then ctrl+click on the checkbox in front of the extension in Burp's extender tab to reload it.

We start by creating a JPanel. JPanel is a container and can use layout managers. We will use the BorderLayout.

Empty tab
1
2
3
4
5
def getUiComponent(self):
    from javax.swing import JPanel
    from java.awt import BorderLayout
    panel = JPanel(BorderLayout())
    return panel

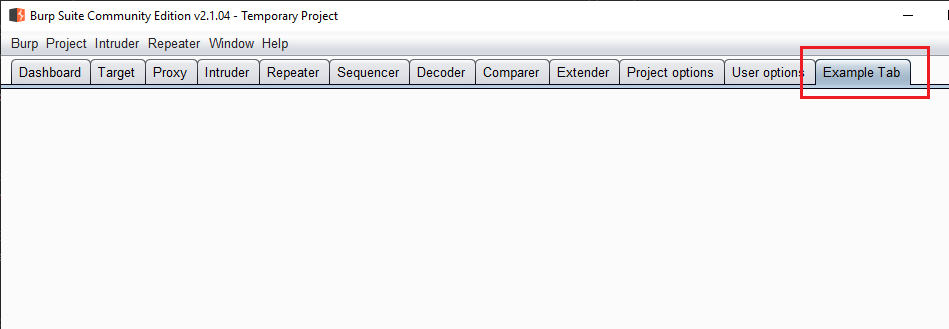
We have an empty tab.

Empty tab Empty tab

Using the BorderLayout, we can assign positions to components in the panel. These positions are:

  • PAGE_START - PAGE_END - LINE_START - LINE_END - CENTER

JButton

Adding some buttons that do nothing to show off different positions. A button is made from the class JButton:

Three buttons
 1
 2
 3
 4
 5
 6
 7
 8
 9
10
11
12
13
14
15
16
def getUiComponent(self):
    from javax.swing import JPanel, JButton
    from java.awt import BorderLayout
    panel = JPanel(BorderLayout())

    # create buttons
    btn1 = JButton("Button 1")
    btn2 = JButton("Button 2")
    btn3 = JButton("Button 3")

    # add buttons to the panel
    panel.add(btn1, BorderLayout.PAGE_START)
    panel.add(btn2, BorderLayout.CENTER)
    panel.add(btn3, BorderLayout.PAGE_END)

    return panel
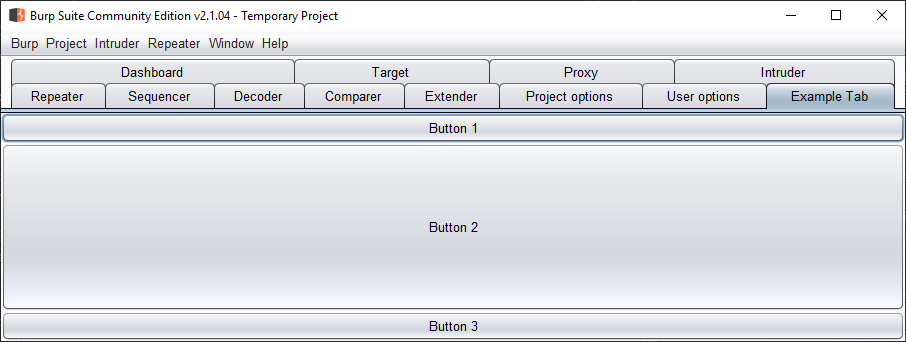
Now we have three buttons Now we have three buttons

We used the second constructor for JButton to set the label. We can also set the fields here. The inherited actionListener field allows us to do something when the button is clicked. To implement this interface we need to create and assign the actionPerformed(ActionEvent e) method.

See this tutorial at https://jython.readthedocs.io/en/latest/chapter16/.

Click button action
 1
 2
 3
 4
 5
 6
 7
 8
 9
10
11
12
13
14
15
16
17
18
19
def getUiComponent(self):
    from javax.swing import JPanel, JButton
    from java.awt import BorderLayout
    panel = JPanel(BorderLayout())

    # create buttons
    def btn1Click(event):
        """What happens when button 1 is clicked."""
        # btn1.setText("Clicked")
        # this is more Jythonic(?)
        btn1.text = "Clicked"
        return

    btn1 = JButton("Button 1", actionPerformed=btn1Click)

    # add buttons to the panel
    panel.add(btn1, BorderLayout.PAGE_START)

    return panel
Button clicked Button clicked

Passing an anonymous method like what we did is quick and works if the interface is simple. We can create a separate module for our GUI and then create and pass an object to getUiComponent.

See the Twitter client example in https://jython.readthedocs.io/en/latest/chapter16/ to see how it can be done better.

JSplitPane

I want to create something like the screenshot in this blog post from 2012 in a framework for creating Python Burp extensions:

Reference screenshot Reference screenshot

To create the left-right split (and also the top-down), we can use a JSplitPane.

Basic JSplitPane
 1
 2
 3
 4
 5
 6
 7
 8
 9
10
11
12
13
14
15
16
17
18
def getUiComponent(self):
    from javax.swing import JPanel, JSplitPane, JLabel
    from java.awt import BorderLayout
    panel = JPanel(BorderLayout())

    # create splitpane - horizontal split
    spl = JSplitPane(JSplitPane.HORIZONTAL_SPLIT)

    # create a label and put in the left pane
    spl.leftComponent = JLabel("left pane")
    spl.rightComponent = JLabel("right pane")

    # the above three instructions can be merged into one.
    # spl = JSplitPane(JSplitPane.HORIZONTAL_SPLIT, JLabel("left pane"),
    #    JLabel("right pane"))

    panel.add(spl)
    return panel

The divider automagically resizes based on the items in the panes. In this case, we have added two JLabels. We can move the divider manually.
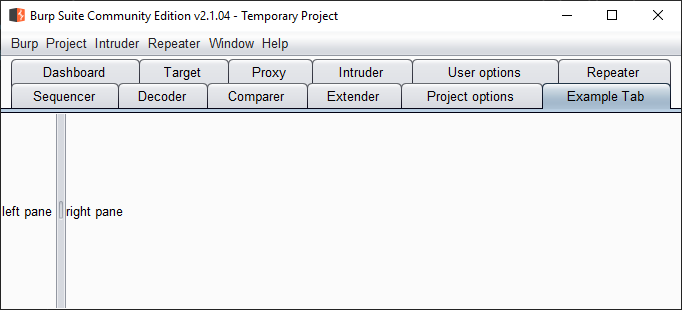
Basic JSplitPane Basic JSplitPane

Update 11 Oct 2019: JSplitPane has a method name setDividerLocation. This method sets the divider. There are two variants of the method. One accepts an int parameter which is the size of divider in pixels. This can be set before the component is painted. The other one accepts a double parameter and sets a percentage. This does not work before the component is painted. If you set it, it has not effect.

JScrollPane

We want the left pane to display a list of items. This is accomplished by adding a JScrollPane to it.

The documentation (the link above) has a lot of text about a viewport and looks complicated. But we just want to display a list of text in it. First, we add the items to a JList. Then we pass it to the JScrollPane's constructor: JScrollPane(Component view).

03-splitpane.py
 1
 2
 3
 4
 5
 6
 7
 8
 9
10
11
12
13
14
15
16
17
18
19
20
def getUiComponent(self):
    from javax.swing import (JPanel, JSplitPane, JLabel, JList,
        JScrollPane, ListSelectionModel)
    from java.awt import BorderLayout
    panel = JPanel(BorderLayout())

    # create a list and then JList out of it.
    colors = ["red", "orange", "yellow", "green", "cyan", "blue", "pink",
        "magenta", "gray","zzzzzzzzzzzzzzzzzzzzzzzzzzzzzzzzzzzzzzzzzzz"]
    list1 = JList(colors)
    # set the selection mode to single items
    # ListSelectionModel.SINGLE_SELECTION = 0
    list1.selectionMode = ListSelectionModel.SINGLE_SELECTION

    # create splitpane - horizontal split
    spl = JSplitPane(JSplitPane.HORIZONTAL_SPLIT, JScrollPane(list1),
        JLabel("right pane"))
    
    panel.add(spl)
    return panel

JList Actions

We can do call a method after each item is selected in the scroll pane. Let's add the selected item to the label in the right pane. We can do it by assigning a method to the valueChanged method for the JList.

In the JList docs we read:

The preferred way to listen for changes in list selection is to add ListSelectionListeners directly to the JList. JList then takes care of listening to the selection model and notifying your listeners of change.

See this tutorial for more info:

The ListSelectionListener has one method:

Similar to the button action, we define an anonymous method and assign it.

04-scrollpane-list.py
 1
 2
 3
 4
 5
 6
 7
 8
 9
10
11
12
13
14
15
16
17
18
19
20
21
22
23
24
25
def getUiComponent(self):
    from javax.swing import (JPanel, JSplitPane, JLabel, JList,
        JScrollPane, ListSelectionModel)
    from java.awt import BorderLayout
    panel = JPanel(BorderLayout())

    # create a list and then JList out of it.
    colors = ["red", "orange", "yellow", "green", "cyan", "blue", "pink",
        "magenta", "gray","zzzzzzzzzzzzzzzzzzzzzzzzzzzzzzzzzzzzzzzzzzz"]

    def listSelect(event):
        """Add the selected index to the label."""
        label1.text += "-" + colors[list1.selectedIndex]

    # create a list and assign the valueChanged
    list1 = JList(colors, valueChanged=listSelect)
    list1.selectionMode = ListSelectionModel.SINGLE_SELECTION

    # create splitpane - horizontal split
    label1 = JLabel("right pane")
    spl = JSplitPane(JSplitPane.HORIZONTAL_SPLIT, JScrollPane(list1),
        label1)
    
    panel.add(spl)
    return panel

You might wonder why we are adding the selected item to the label instead of modifying the label. It demonstrates the following gotcha.
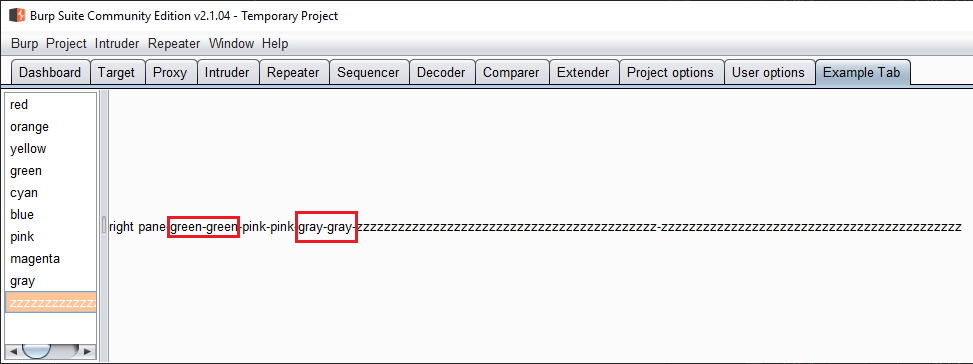
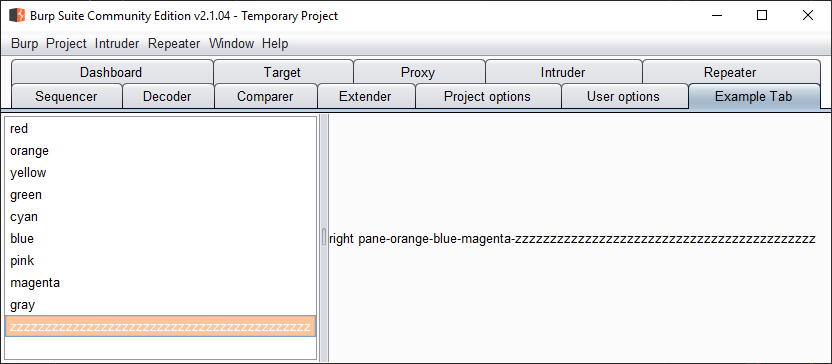
Items is added to the label twice Items is added to the label twice

Each selected item is added to the label twice. This means that valueChanged is called twice. I found the answer on stackoverflow. Long story short, when listening to the events, we need to check if valueIsAdjusting is set to False. Java sets this to True when we are in a series of changes that are considered part of a single change. More info:

We can change the the listSelect method as follows:

listSelect in 05-scrollpane-list-fixed.py
1
2
3
4
5
6
7
def listSelect(event):
    """Add the selected index to the label. Called twice when
    selecting the list item by mouse. So we need to use
    getValueIsAdjusting inside.
    """
    if not event.getValueIsAdjusting():
        label1.text += "-" + colors[list1.selectedIndex]
Double add fixed Double add fixed

JTabbedPane

Instead of a label, we want to add two tabs to the right panel and reflect the results to one of them. The main frame in Burp is also a type of JTabbedPane. We are going to:

  1. Create a JTabbedPane.
  2. Create two JLabels.
  3. Add the labels to the tabbed pane from step 1.
  4. Assign the tabbed pane to the split pane.
06-tabbedpane.py
 1
 2
 3
 4
 5
 6
 7
 8
 9
10
11
12
13
14
15
16
17
18
19
20
21
22
23
24
25
26
27
28
29
30
31
32
33
def getUiComponent(self):
    from javax.swing import (JPanel, JSplitPane, JList,
        JScrollPane, ListSelectionModel, JLabel, JTabbedPane)
    from java.awt import BorderLayout
    panel = JPanel(BorderLayout())

    # create a list and then JList out of it.
    colors = ["red", "orange", "yellow", "green", "cyan", "blue", "pink",
        "magenta", "gray","zzzzzzzzzzzzzzzzzzzzzzzzzzzzzzzzzzzzzzzzzzz"]

    def listSelect(event):
        if not event.getValueIsAdjusting():
            label1.text += "-" + colors[list1.selectedIndex]

    # create a list and assign the valueChanged
    list1 = JList(colors, valueChanged=listSelect)
    list1.selectionMode = ListSelectionModel.SINGLE_SELECTION

    # create a JTabbedPane
    tabs = JTabbedPane()

    # add labels to it
    label1 = JLabel()
    label2 = JLabel()
    tabs.addTab("Tab 1", label1)
    tabs.addTab("Tab 2", label2)

    # create splitpane - horizontal split
    spl = JSplitPane(JSplitPane.HORIZONTAL_SPLIT, JScrollPane(list1),
        tabs)
    
    panel.add(spl)
    return panel
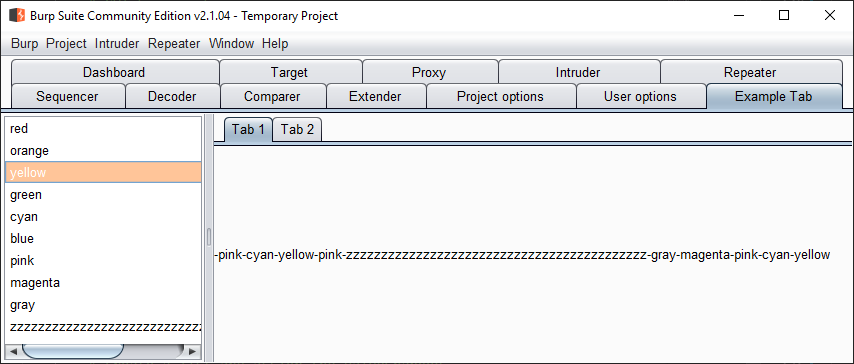
JTabbedPane in action JTabbedPane in action

StyledDocument

Instead of using a label, we can use a JTextPane and load a StyledDocument in it. We can add text (or other things like images) with specific styles to the document.

The other tab will be a JEditorPane with https://example.net loaded. We need to change the listSelect method and add items to the StyledDocument. This can be done with insertString (there are other methods for different content).

07-styleddocument.py
 1
 2
 3
 4
 5
 6
 7
 8
 9
10
11
12
13
14
15
16
17
18
19
20
21
22
23
24
25
26
27
28
29
30
31
32
33
34
35
36
37
38
39
def getUiComponent(self):
    from javax.swing import (JPanel, JSplitPane, JList, JTextPane,
        JScrollPane, ListSelectionModel, JLabel, JTabbedPane, JEditorPane)
    from java.awt import BorderLayout
    panel = JPanel(BorderLayout())

    # create a list and then JList out of it.
    colors = ["red", "orange", "yellow", "green", "cyan", "blue", "pink",
        "magenta", "gray","zzzzzzzzzzzzzzzzzzzzzzzzzzzzzzzzzzzzzzzzzzz"]

    def listSelect(event):
        if not event.getValueIsAdjusting():
            doc1.insertString(0, colors[list1.selectedIndex] + "-", None)

    # create a list and assign the valueChanged
    list1 = JList(colors, valueChanged=listSelect)
    list1.selectionMode = ListSelectionModel.SINGLE_SELECTION

    # create a StyledDocument.
    from javax.swing.text import DefaultStyledDocument
    doc1 = DefaultStyledDocument()
    # create a JTextPane from doc1
    tab1 = JTextPane(doc1)

    # create a JEditorPane for tab 2
    tab2 = JEditorPane("https://example.net")

    # create the tabbedpane
    tabs = JTabbedPane()

    tabs.addTab("Tab 1", tab1)
    tabs.addTab("Tab 2", tab2)

    # create splitpane - horizontal split
    spl = JSplitPane(JSplitPane.HORIZONTAL_SPLIT, JScrollPane(list1),
        tabs)
    
    panel.add(spl)
    return panel

The text is added to tab 1. We are inserting new text to the beginning.
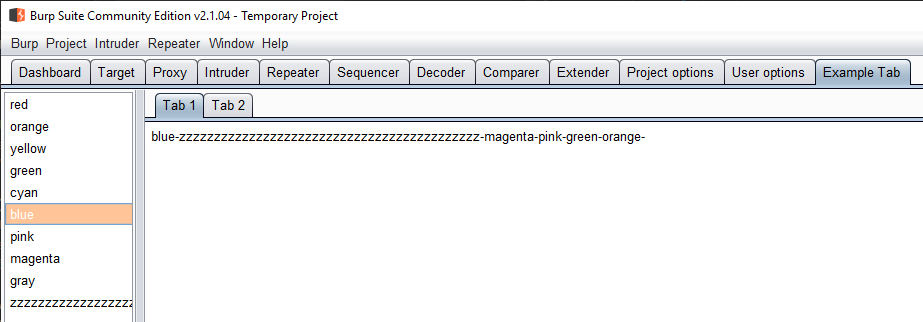
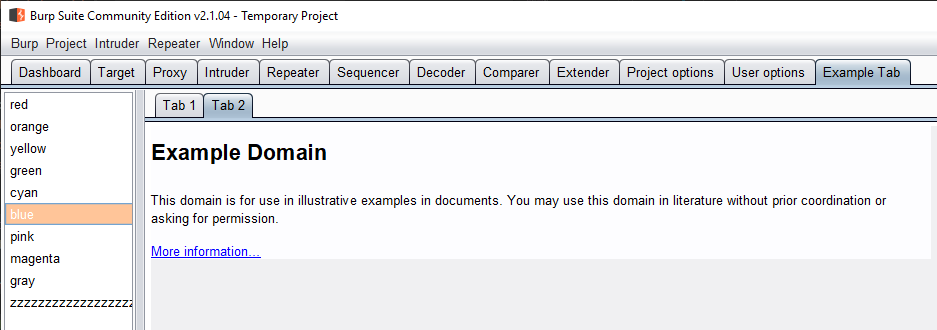
Text added to the JEditorPane Text added to the JEditorPane

The other tab shows example.net:

example.net in JEditorPane example.net in JEditorPane

Both tabs allow us to edit. To disable editing do tab2.editable = False (or use tab2.setEditable(False) which is not Pythonic).

Custom Styles in StyledDocument

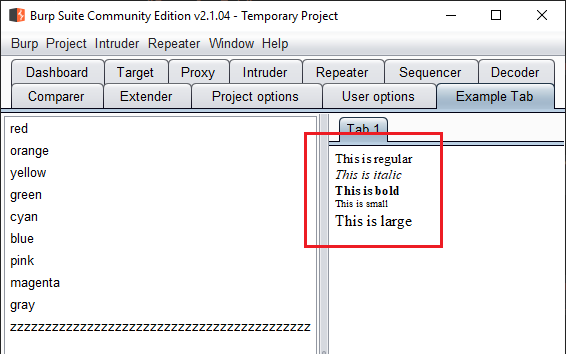
StyledDocument allows us to create new Styles and add text/graphics/etc as we see fit. This works for a small amount of data.

Styles appear to be in a hierarchy where items further down in the styles tree inherit items from their parents. Everything is a child of the default style 1.

Styles are added to the document with addStyle. The first parameter is the name and the second is the parent style. Items are added with insertString (or other inserts).

08-custom-style.py
 1
 2
 3
 4
 5
 6
 7
 8
 9
10
11
12
13
14
15
16
17
18
19
20
21
22
23
24
25
26
27
28
29
30
31
32
33
34
35
36
37
38
39
40
41
42
43
44
45
46
47
48
49
50
51
52
53
54
55
56
57
58
59
60
61
62
def getUiComponent(self):
    from javax.swing import (JPanel, JSplitPane, JList, JTextPane,
        JScrollPane, ListSelectionModel, JLabel, JTabbedPane, JEditorPane)
    from java.awt import BorderLayout
    panel = JPanel(BorderLayout())

    # create a list and then JList out of it.
    colors = ["red", "orange", "yellow", "green", "cyan", "blue", "pink",
        "magenta", "gray","zzzzzzzzzzzzzzzzzzzzzzzzzzzzzzzzzzzzzzzzzzz"]

    # create a list - the list is not used in this example
    list1 = JList(colors)
    list1.selectionMode = ListSelectionModel.SINGLE_SELECTION

    # create a StyledDocument for tab 1
    from javax.swing.text import DefaultStyledDocument
    doc = DefaultStyledDocument()
    # create a JTextPane from doc
    tab1 = JTextPane(doc)
    tab1.editable = False

    # we can add more styles
    # new styles can be a child of previous styles
    # our first style is a child of the default style
    from javax.swing.text import StyleContext, StyleConstants
    defaultStyle = StyleContext.getDefaultStyleContext().getStyle(StyleContext.DEFAULT_STYLE)

    # returns a Style
    regular = doc.addStyle("regular", defaultStyle)
    StyleConstants.setFontFamily(defaultStyle, "Times New Roman")

    # make different styles from regular
    style1 = doc.addStyle("italic", regular)
    StyleConstants.setItalic(style1, True)

    style1 = doc.addStyle("bold", regular)
    StyleConstants.setBold(style1, True)

    style1 = doc.addStyle("small", regular)
    StyleConstants.setFontSize(style1, 10)

    style1 = doc.addStyle("large", regular)
    StyleConstants.setFontSize(style1, 16)

    # insert text
    doc.insertString(doc.length, "This is regular\n", doc.getStyle("regular"))
    doc.insertString(doc.length, "This is italic\n", doc.getStyle("italic"))
    doc.insertString(doc.length, "This is bold\n", doc.getStyle("bold"))
    doc.insertString(doc.length, "This is small\n", doc.getStyle("small"))
    doc.insertString(doc.length, "This is large\n", doc.getStyle("large"))

    # create the tabbedpane
    tabs = JTabbedPane()

    tabs.addTab("Tab 1", tab1)

    # create splitpane - horizontal split
    spl = JSplitPane(JSplitPane.HORIZONTAL_SPLIT, JScrollPane(list1),
        tabs)
    
    panel.add(spl)
    return panel
Custom styles Custom styles

What Did We Learn Here Today

We learned how to make Jython Swing GUIs by hand. There are things we did not discuss like checkboxes and radio buttons but the same principle applies.

In the next part, we will see how we can leverage NetBeans (or other GUI designers) to create interfaces. Then we will "translate" the code from Java to Jython using the knowledge we acquired in this post. Knowing how things work allows us to customize the controls to some extent and troubleshoot when things go wrong.


  1. I could be wrong about this but all examples do the same. ↩︎