TL;DR:
Instead of creating an index manually for Github, I am using a Hugo blog for my knowledge base (a.k.a. Parsia-Clone). This blog is about my flow and how I have semi-automated the process. Demo site is at https://parsiya.io (it's served in plaintext because I am making rapid changes and do not want to invalidate CloudFront's cache after every push).
Flow
Flow is pretty simple:
- Create the page bundle directory and page in the clone with
hugo new. I usually create it undercategories\main-category-name. The command will look like:hugo new categories\research\hacking-the-gibson\index.md
- Run
hugo serveto preview the page during the edit. - Fill front matter and write the page in
index.md. - Any resources such as pictures and files can be in the same directory. This helps in two ways, they can be referenced in the page (like pictures) and seen on Github (like config files).
- When done,
git add/commit/pushthe clone inside thecontentdirectory. - ???
- Profit. See updated blog, built and deployed by
Travis CI.
Required Knowledge
- Markdown: It's pretty easy to pick up. While it's not very powerful in terms of syntax, it's more than enough for most quick notes.
- Hugo: The static website engine. Technically you can use any similar framework. I like Hugo and it works for me.
- Travis CI: Some very basic knowledge about Travis CI. I just learned it last night.
- You can read about my flow at: Deploying my Knowledge Base at parsiya.io to S3 with Travis CI
- Setting up static websites: There are many guides out there, I host all my static websites out of S3 buckets. But you could use any other way.
Background or Justification
I have always been a fan of documentation. Not that I'm particularly good at it. I am also a fan of not memorizing everything. Being in security consulting, I am on new projects every other week. Meaning, I learn something, then move to a completely different tech stack/project and I have to re-learn it in a few months. Instead of memorizing everything, I write them down and then reference them next time I have to do something.
I have been creating a similar knowledge base at Cigital/Synopsys since 2016. It's been decently received. I have the most stars on our internal git repository. Better yet, I can point people to it so they do not have to re-invent the wheel. Win-win on both sides.
Your future self will have another benefit. When documenting, don't just document the solution but also document anything else you have learned along the way. These are most likely your future problems/solutions.
Problem
Documentation is time-consuming. It takes a lot more to write things down, than to just learn something. Granted, by writing I learn more but the temptation is there to just get things done and move on. Time spent grows exponentially if I also document other things I have learned during the search as I mentioned above.
It's also very manual, if something can be mindlessly copy/pasted then it's really not worth documenting (this is a broad generalization). But my problems are usually very customized. I have to go through 3 search query refining cycles to get to roughly relevant material, then sift between the first 5 pages of search results to get my answer. This takes time.
Indexing is complicated, my clone has a long table of contents on the front page. Every time I change something, I need to go and update the index. This is cumbersome and unnecessary. I do not want to just rely on search to find stuff for me, I need to have an index.
Solution
Some parts cannot be automated. For example knowledge base creation and documentation is almost always manual. But we can at least automate indexing, deployment and storage.
In this document I will talk about how I have revamped parsiya.io so it's easier to maintain.
Page Creation
It's very tempting to classify pages by a directory structure, it looks nice but it takes a lot of time. Instead we can make a directory anywhere, name it something and put the markdown file and static resources (e.g. images) there. I usually create them under the first category that I think is relevant but ultimately it does not matter.
Hugo Page Bundles
Hugo has page bundles. Instead of storing images in the static directory, you can create a directory, write your markdown in a file named index.md and then link to pictures and other assets in the same directory or sub-directories. Everything in that directory and under will be part of the same bundle. Each post will be a new page bundle.
Here's some of my repo:
├───abandoned-research
│       BMC-Track-It-11.2.md
│       learning-triton-blog-post.md
│       _index.md
│
├───blockchain
│       _index.md
│
├───configs
│   │   gitconfig
│   │   README.md
│   │   ubuntu-16-setup.md
│   │   _index.md
│   │
│   └───sublime-text
│       │   index.md
│       │
│       └───sublime-config-files
│               Bold and Italic Markers.tmPreferences
│               Default (Windows).sublime-keymap
│               ...
├───random
│   │   mingw-windows.md
│   │   octopress-migration.md
│   │   search-path.md
│   │   _index.md
...
The Github vs. Hugo Dilemma
My original clone is based on the web interface of our Git server. Major products (Gitlab, Github, Bitbucket etc.) support rendering markdown documents with syntax highlighting and formating in their web interface.
The web interface can use a directory structure and will automatically display the readme.md file in the root of each directory. Markdown documents can have picture, code and link to each other.
I wanted my website to also be somewhat usable, after all it's mostly markdown documents with pictures and code. This creates a problem, page bundles are index.md in Hugo but readme.md in Github. The solution is somewhat hacky. Just make a copy of first file and name it readme.md. index.md is used by Hugo and readme.md is used by the Git repo's web interface.
This introduces a new problem, these readme.md files will be rendered by Hugo the result will be a double index. The solution is easy, ignore them in the Hugo config file:
ignorefiles = ["README.*"]
Page Classification
Hugo already supports categories and tags out of the box (and we can also add our own custom items to front matter). Clone uses categories for page classification. Index will later use this. See more at Hugo Taxonomies.
Note that while I have mostly created pages under the category directory, they can be anywhere. The front matter will decide which categories the page ends up in.
Index
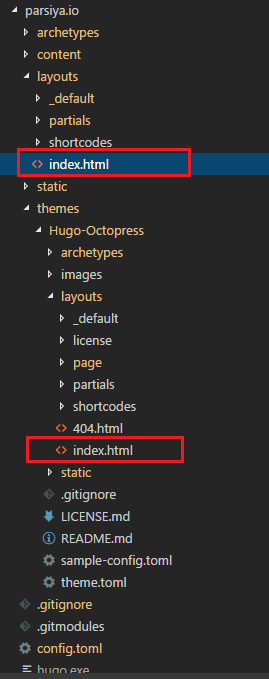
Index is the front page of the blog and must contain everything. Pages need to be classified by category. This is easy, we can override the theme layout in our Hugo website without touching the theme. This is done by creating a similar file under the layouts directory. For example, in Hugo index is created based on the template at themes\theme-name\layouts\index.html. We create a layouts\index.html in the parent website to override it.
 Overriding index
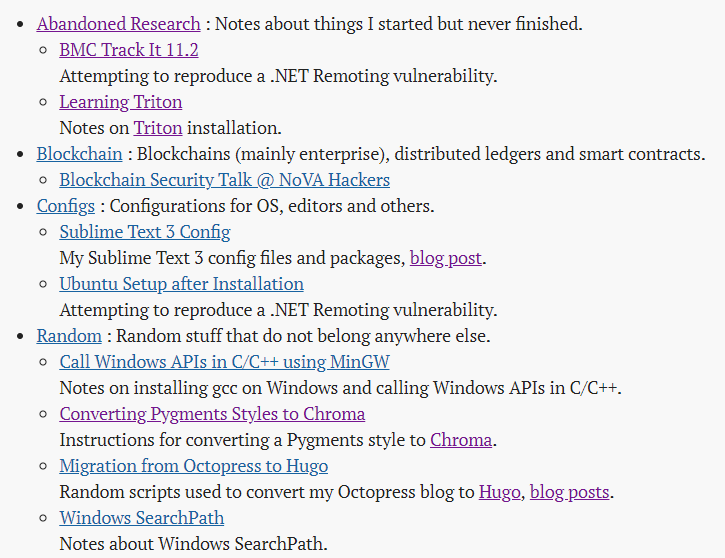
In the new index, I am displaying page titles by category. Abandoned Research is the name of the category and BMC Track It 11.2 is the name of the page.
 Index page
Snippets
As you can see, each category and page has its own snippet. Those are useful for giving the reader a general idea of what the item is.
Page Snippets
Page snippets are added in front matter, each page can have an optional new item named snippet. The snipper will appear in the index and can be markdown. For example, one page has this front matter.
| |
snippet can also contain markdown because it's later passed to Hugo's markdownify. If wip is set to true, then the page title will have a WIP after it. The magic happens inside index.html:
| |
Category Snippets
Categories can also have their own snippets, these snippets show up in index and also on each category's page. In Hugo, categories can have their own front matter. Front matter is contained in such a file:
content\categories\category-name\_index.md
This means, in order to have the category snippets, you have to create categories\category-name for each snippet. Front matter for Abandoned Research category is:
| |
Remember you can have pretty much anything you want in front matter.
Both kind of snippets also show up in category pages:
 Category page
Sidebar
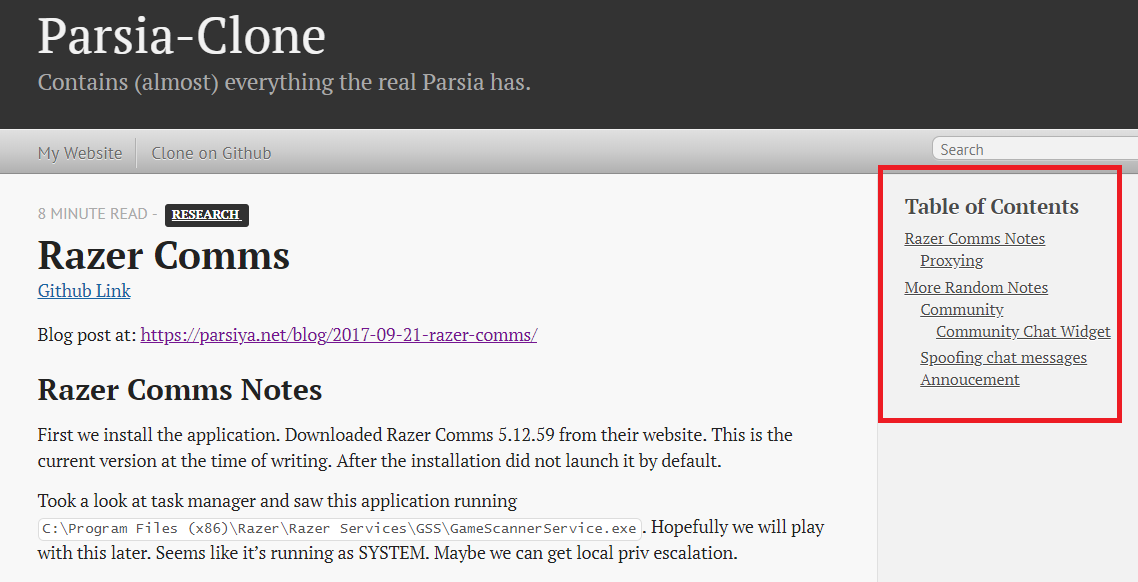
I have also changed the sidebar. I have removed the links via the config file and have created a separate sidebar for single pages. The sidebar for single pages now contains a table of contents. The idea was taken from the Hugo theme named bootie-docs. This means I had to override the single page template by adding my own file at layouts\_default\single.html and use a different partial for the sidebar at partials\sidebar-single.html.
| |
Which looks like this:
 Table of Contents in the sidebar
Unfortunately pinning the toc to the right of the page when scrolling down is much harder than I imagined. I can pin it to right with position: fixed but it will go and get attached to the right of the browser border and not the parent container. I can remove sticky and float:left and it will work correctly on the left side.
Page Header and Footer
Author name and publish date have been removed from footer. Header now contains a link to the original file on Github.
Automation
Automated publishing is performed via Travis CI. You can read about it in a different blog post:
Conclusion
I have automated my knowledge base creation a bit. I will hopefully make it better. Automation means productivity more time for slacking. As usual, if you have any questions/concerns/feedback, you know where to find me.