TL;DR
Problem: We have an encrypted Virtual Machine (VM) disk and the associated VirtualBox (VBox) live snapshot (taken when user was logged in). Mount the VM and restore the live snapshot to get access to the data.
It seems pretty easy, but turns out it's not and looks to be a first of its kind tutorial (at least public). This is surprising because I can imagine this issue being a recurring problem in the forensics community.
A few days ago I did a couple of Forensics challenges. Both involved mounting images and analyzing the contents of a VM. The second challenge was a disk and a live snapshot. Part of the challenge involved mounting the snapshot and restoring the state to log in.
It's an ongoing challenge so I do not want to spill the beans. Instead, I have re-created a VM to show what I did. Hopefully this will help the next person with a similar problem.
Table of Contents
- Table of Contents
- Setup
- Recon
- Reading the VDI in Another VM
- How do We Trick VBox into Restoring Our Saved State?
- Where do We Go From Here?
- Conclusion and Future Work
Setup
- VirtualBox: If VBox people break compatibility, we have to download an older version. Later we will see how to extract the VBox version used to create the image.
- Sample VDI and live snapshot from Google Drive: If you want to play along and practice.
- Encrypted VM and snapshot (2GB): Encrypted disk with live snapshot 1.
- A Hex editor. I use HxD.
Recon
After extracting the 7z file, we have these files:
E:\MysteryVM>tree /F
Folder PATH listing for volume Local Disk
E:.
│   MysteryVM.vdi
│
└───Snapshots
        2018-01-23T03-19-37-348469500Z.sav
Reading the VDI in Another VM
Detecting the file system and mounting the disk in another VM is the easiest way to read the disk if it's not encrypted. This is easy to do in VBox (or any other virtualization platform).
In this case I am going to mount it in a Kali VM. Kali; after all, is a Debian distro with a bunch of security tools pre-installed.
- Stop the Kali VM if running.
Settings > Storage > Add a new SATA hard disk.Choose existing diskand select the VDI.- Boot up the Kali VM.
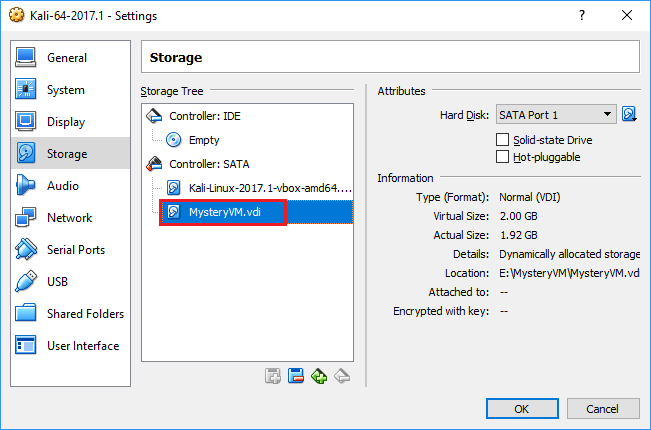 Adding MysteryVM.vdi as a disk to Kali
But the drive is encrypted, oops!
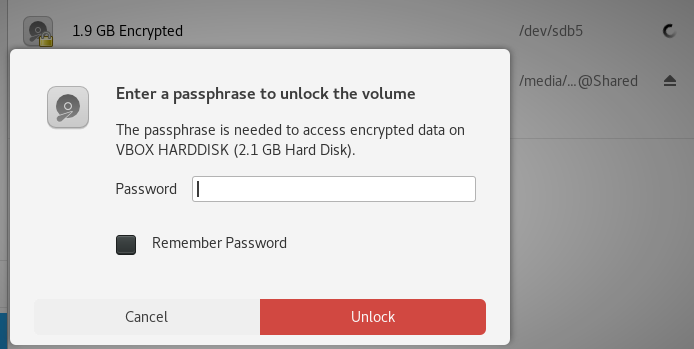 Need the passphrase
That did not work, so we must:
- Find/Crack the disk passphrase. Not usually feasible.
- Restore the live snapshot in VBox.
Stop the VM and remove the disk. VBox allows each disk to be only part of one VM.
How do We Trick VBox into Restoring Our Saved State?
This is "my contribution" to science. We need to tell VBox to run the VM and restore the live snapshot. This way, we are logged-in after the VM is running.
What's the Operating System?
When a VM is created in VBox, we can define the VM (e.g. Windows 7 64-bit). I am not sure if it's really relevant but we can still discover the OS by sifting through the VDI file. The disk is encrypted but we have two other pieces of information:
- Swap partition
- Live snapshot
What's in the Swap File and Live Snapshot?
The VDI comes with a separate swap partition. Using a swap partition/file is
common practice for most operating systems. Open the VDI with 7-zip and extract
0.img.
 Swap partition in VDI
Open the swap partition with a hex editor. Although the disk is encrypted, swap
partition contains some clues about the OS. Running strings on it and
searching for linux outputs some familiar strings. I am going to search for
Debian because I know the OS but you can try other things.
E:\MysteryVM> strings64.exe 0.img | findstr Debian
4.9.0-4-amd64 (debian-kernel@lists.debian.org) #1 SMP Debian 4.9.65-3 (2017-12-03)
4.9.0-4-amd64 (debian-kernel@lists.debian.org) #1 SMP Debian 4.9.65-3+deb9u1 (2017-12-23)
GCC: (Debian 6.3.0-6) 6.3.0 20170205
GCC: (Debian 6.3.0-6) 6.3.0 20170205
grub_target_cc_version='gcc-6 (Debian 6.3.0-6) 6.3.0 20170205'
...
The snapshot gives us the same strings:
E:\MysteryVM>strings64.exe Snapshots/2018-01-23T03-19-37-348469500Z.sav | findstr "Debian"
Debian GNU/Linux system are free
h as Debian
having that way in Debian under
GCC: (Debian 6.3.0-18)
 Debian 4.9.65-3+deb9u1
GCC: (Debian 6.3.0-18)
GCC: (Debian 6.3.0-18)
GCC: (Debian 6.3.0-18)
GCC: (Debian 6.3.0-18)
GCC: (Debian 6.3.0-18)
...
Now we know it's a Debian distro (even the GCC version).
Mounting the VM in VBox
Create a new Debian 64-bit VM in VBox and add the VDI as disk. Go with the default settings (e.g. 1024MB RAM).
Adding the Snapshot
Do not start the VM. Instead, right click on the newly created VM in VBox and
select Show in Explorer to open the VM directory. Copy (do not move, we do not
want to lose our original copies) the Snapshots directory to that path. Then
close VBox because it will overwrite the config files when it exits.
The directory should look like this:
E:\VirtualBox VMs\MysteryVM>tree /F
Folder PATH listing for volume Local Disk
E:.
│   MysteryVM.vbox
│   MysteryVM.vbox-prev
│
├───Logs
│       VBox.log
│       VBoxHardening.log
│
└───Snapshots
        2018-01-23T03-19-37-348469500Z.sav
Now make a copy of MysteryVM.vbox and open the original in a text editor. It's
an XML file. We are interested in this tag:
<Machine uuid="{048b16c8-20be-463f-8808-24443c7493e2}"
    name="MysteryVM" OSType="Debian_64" snapshotFolder="Snapshots"
    lastStateChange="2018-01-23T03:38:51Z">
We only need to add the stateFile like this:
<Machine uuid="{a5ce5d3d-9fca-4d72-a391-78d41c8d451c}"
    name="MysteryVM" OSType="Debian_64" snapshotFolder="Snapshots"
    lastStateChange="2018-01-23T02:52:12Z"
    stateFile="Snapshots/2018-01-23T03-19-37-348469500Z.sav">
Make sure the filename is the same as the live snapshot we copied.
Start VBox and the VM should have a saved state. If it does not close VBox and try again.
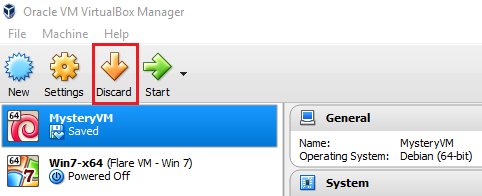 Saved state added to VM
Trial and Error in VBox
Now we start the trial and error sequence. Start the VM and resolve any errors. Rinse and repeat.
First Blood: Memory Size Mismatch
We do not have the correct amount of RAM.
Failed to load unit 'mm' (VERR_SSM_LOAD_MEMORY_SIZE_MISMATCH).

Result Code:
E_FAIL (0x80004005)
Component:
ConsoleWrap
Interface:
IConsole {872da645-4a9b-1727-bee2-5585105b9eed}
The error message does not give us any info, so we need to jump into the
snapshot file (sav file). Luckily, we can find our answer at
https://superuser.com/a/936602.
Each sav file has some units. We are looking for the Memory Manager (mm)
unit which has the RAM size. Using the instructions from the SuperUser answer,
we can find the RAM size (we will dissect some parts of the sav file in a
future post).
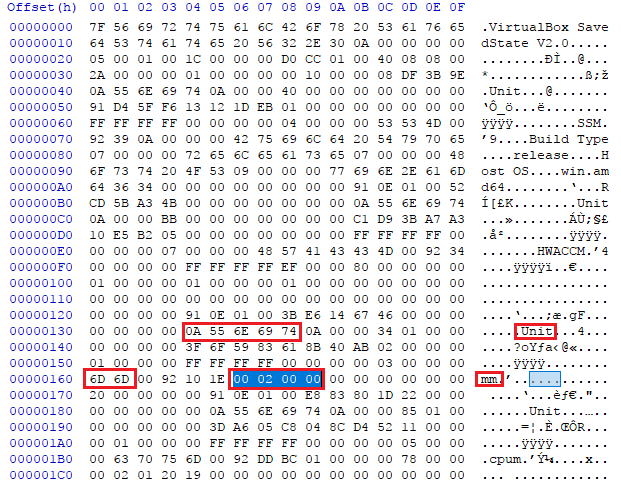 VM RAM size
We have 0x200 in little-endian. RAM Size: 512 MB.
Stop the VM, change the memory in VBox to 512 and restart. We can also edit
the vbox XML file:
FROM: <Memory RAMSize="1024"/>
TO  : <Memory RAMSize="512"/>
"VRam" size mismatch
Next error is very clear. We need to change the video RAM size.
pgm#1: MMIO2 region "VRam" size mismatch:
saved=0000000001400000 config=0000000001000000
[ver=14 pass=final] (VERR_SSM_LOAD_CONFIG_MISMATCH).

Result Code:
E_FAIL (0x80004005)
Component:
ConsoleWrap
Interface:
IConsole {872da645-4a9b-1727-bee2-5585105b9eed}
The error message is really helpful this time. Unlike RAM, VRAM is in bytes (not MBs):
- saved:
1400000==20MB - config:
1000000==16MB
Modify the XML (close the GUI first because it overwrites the vbox file every time you close it) or use the GUI:
FROM: <Display VRAMSize="16"/>
TO  : <Display VRAMSize="20"/>
Missing Device on Port 0
Now this one is pretty interesting and had me baffled for a while.
ahci#0: The target VM is missing a device on port 0.
Please make sure the source and target VMs have compatible storage configurations
[ver=8 pass=final] (VERR_SSM_LOAD_CONFIG_MISMATCH).

Result Code:
E_FAIL (0x80004005)
Component:
ConsoleWrap
Interface:
IConsole {872da645-4a9b-1727-bee2-5585105b9eed}
Looking at the configuration, we can see our hard disk on port 0:
<StorageController name="IDE" type="PIIX4" PortCount="2" useHostIOCache="true"
                   Bootable="true">
  <AttachedDevice type="HardDisk" hotpluggable="false" port="0" device="0">
    <Image uuid="{cde4de0a-2d80-4c57-85e5-e1813c7d2c68}"/>
  </AttachedDevice>
  <AttachedDevice passthrough="false" type="DVD" hotpluggable="false" port="1" device="0"/>
</StorageController>
If you do not have the VDI on the IDE port, you might get a different error.
Why are we getting this error? There's a device on port 0 (the hard disk). Searching the internet and VBox forums are less than helpful. Almost all answers are "delete the saved state and restart the VM." This is not what we need.
Let's remove the VDI and attach it as an SATA device. To do this, we must remove
the state, do the configuration in the GUI and then re-do the saved state
(adding stateFile=... and copying the sav file again). I did this because I
did not know (or be bothered to find out) what to change in the vbox file.
Now the config file looks like:
<StorageController name="IDE" type="PIIX4" PortCount="2" useHostIOCache="true"
    Bootable="true"/>

<StorageController name="SATA" type="AHCI" PortCount="1"
    useHostIOCache="false" Bootable="true" IDE0MasterEmulationPort="0"
    IDE0SlaveEmulationPort="1" IDE1MasterEmulationPort="2"
    IDE1SlaveEmulationPort="3">
    <AttachedDevice type="HardDisk" hotpluggable="false" port="0" device="0">
        <Image uuid="{cde4de0a-2d80-4c57-85e5-e1813c7d2c68}"/>
    </AttachedDevice>
</StorageController>
We have one empty CD-drive on IDE primary master and the VDI as a(n) SATA device.
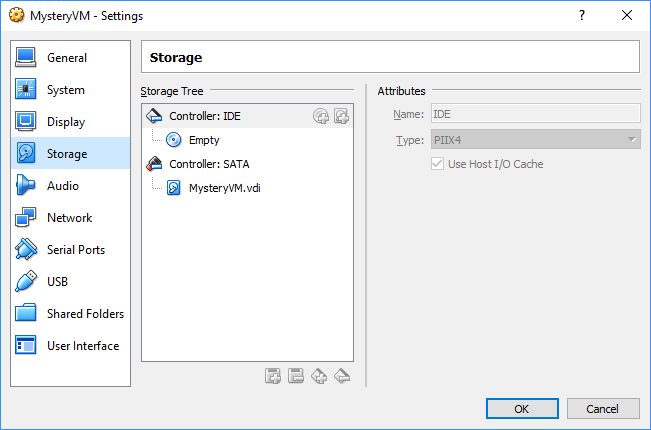 Drives after modification
Secondary Master Device
Now we need a secondary master device.
piix3ide#0: The target VM is missing a secondary master device.
Please make sure the source and target VMs have compatible storage
configurations [ver=20 pass=final] (VERR_SSM_LOAD_CONFIG_MISMATCH).

Result Code:
E_FAIL (0x80004005)
Component:
ConsoleWrap
Interface:
IConsole {872da645-4a9b-1727-bee2-5585105b9eed}
You know the drill. Add an empty secondary master IDE and re-try. Be sure to choose secondary master.
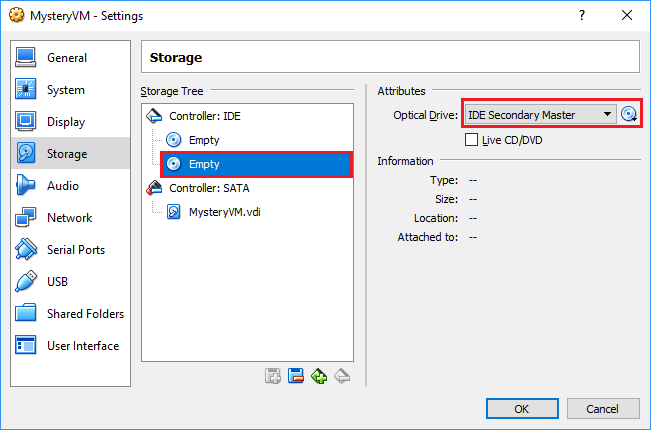 Adding secondary master
Great Success
Annnnnnnd we're in.
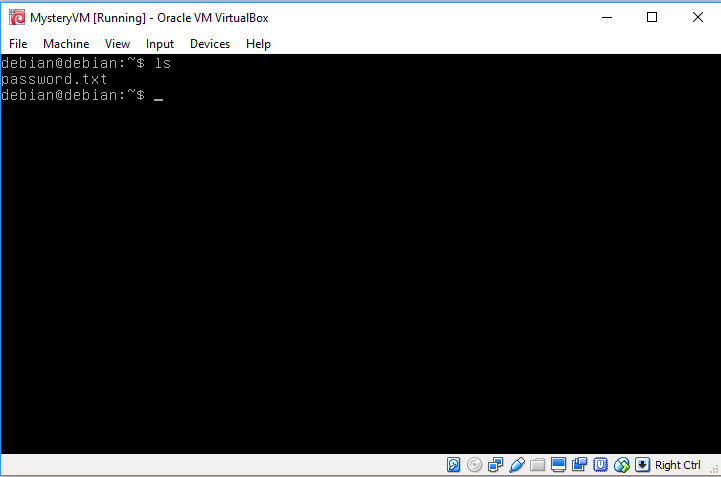 Logged-in
Bonus Errors
During the challenge I encountered a couple of more errors. I am documenting them here for future reference.
Bonus Error #1 - fIoApicPresent: saved=true config=false
This is for I/O APIC mode in System.
Failed to open a session for the virtual machine MysteryVM.

apic#0: Config mismatch - fIoApicPresent: saved=true
config=false [ver=3 pass=final] (VERR_SSM_LOAD_CONFIG_MISMATCH).

Result Code: E_FAIL (0x80004005)
Component: ConsoleWrap
Interface: IConsole {872da645-4a9b-1727-bee2-5585105b9eed}
Either use the GUI or modify the config file and enable it:
<BIOS>
    <IOAPIC enabled="true"/>
</BIOS>
Bonus Error #2 - uApicMode: saved=2 config=3
This one is more interesting:
Failed to open a session for the virtual machine MysteryVM.

apic#0: Config mismatch - uApicMode: saved=2 config=3
[ver=3 pass=final] (VERR_SSM_LOAD_CONFIG_MISMATCH).

Result Code: E_FAIL (0x80004005)
Component: ConsoleWrap
Interface: IConsole {872da645-4a9b-1727-bee2-5585105b9eed}
Change this to false:
<CPU>
    <X2APIC enabled="true"/>
</CPU>
Detailed discussion follows.
uApicMode
Searching for uApicMode returns only a few results. Both of the errors that we
have seen come from this file:
static int apicR3LoadVMData(PVM pVM, PSSMHANDLE pSSM)
{
    PAPIC pApic = VM_TO_APIC(pVM);

    /* Load and verify number of CPUs. */
    uint32_t cCpus;
    int rc = SSMR3GetU32(pSSM, &cCpus);
    AssertRCReturn(rc, rc);
    if (cCpus != pVM->cCpus)
        return SSMR3SetCfgError(pSSM, RT_SRC_POS,
            N_("Config mismatch - cCpus: saved=%u config=%u"),
            cCpus, pVM->cCpus);

    /* Load and verify I/O APIC presence. */
    bool fIoApicPresent;
    rc = SSMR3GetBool(pSSM, &fIoApicPresent);
    AssertRCReturn(rc, rc);
    if (fIoApicPresent != pApic->fIoApicPresent)
        return SSMR3SetCfgError(pSSM, RT_SRC_POS,
            N_("Config mismatch - fIoApicPresent: saved=%RTbool config=%RTbool"),
            fIoApicPresent, pApic->fIoApicPresent);

    /* Load and verify configured max APIC mode. */
    uint32_t uSavedMaxApicMode;
    rc = SSMR3GetU32(pSSM, &uSavedMaxApicMode);
    AssertRCReturn(rc, rc);
    if (uSavedMaxApicMode != (uint32_t)pApic->enmMaxMode)
        return SSMR3SetCfgError(pSSM, RT_SRC_POS,
               N_("Config mismatch - uApicMode: saved=%u config=%u"),
               uSavedMaxApicMode, pApic->enmMaxMode);

    return VINF_SUCCESS;
}
We are getting an error when comparing the max APIC mode. Ours is 3, config is
2. But what is this?
Searching for max apic sends us to a reddit thread:
Max APIC IDs reserved field is Valid. A value of 0 for HTT indicates there is only a single logical processor in the package and software should assume only a single APIC ID is reserved. A value of 1 for HTT indicates the value in CPUID.1.EBX[23:16]_(the Maximum number of addressable IDs for logical processors in this package) is valid for the package.
But does it have anything to do what we want? How do we change it? What do we need to change in our CPU config?
Inside /VMM/include/APICInternal.h:
/** The max supported APIC mode from CFGM.  */
    PDMAPICMODE                 enmMaxMode;
And later in VBox/vmm/pdmdev.h:
typedef enum PDMAPICMODE
{
    /** Invalid 0 entry. */
    PDMAPICMODE_INVALID = 0,
    /** No APIC. */
    PDMAPICMODE_NONE,
    /** Standard APIC (X86_CPUID_FEATURE_EDX_APIC). */
    PDMAPICMODE_APIC,
    /** Intel X2APIC (X86_CPUID_FEATURE_ECX_X2APIC). */
    PDMAPICMODE_X2APIC,
    /** The usual 32-bit paranoia. */
    PDMAPICMODE_32BIT_HACK = 0x7fffffff
} PDMAPICMODE;
This seems to be it. We have X2APIC (3) enabled but want APIC (2). First
enum is 0 and next is 1 and so on. iota in Go is a copycat.
Inside the config file we have this:
<CPU>
    <PAE enabled="false"/>
    <LongMode enabled="true"/>
    <X2APIC enabled="true"/>
    <HardwareVirtExLargePages enabled="true"/>
</CPU>
We are going to change it to false and then try again.
Different Enum
On a side-note, this threw me off. Inside /VBox/Devices/PC/BIOS/post.c there's a different enum:
#define APICMODE_DISABLED   0
#define APICMODE_APIC       1
#define APICMODE_X2APIC     2
This is off by one compared to what we got in the error message (X2APIC is 3 there but 2 here).
Where do We Go From Here?
Now that we are inside, we can finally see inside the password.txt file which
is the password for both the debian/root accounts and also the disk password
(yes I know it's a bad password and also password re-use is bad).
Another thing to always check is the clipboard, in this case I have not installed a desktop environment so it's useless but be sure to always check.
A lot of forensics CTF challenges focus on grabbing keys/credentials in memory. Mounted luks or truecrypt containers are popular.
Conclusion and Future Work
We did a practical exercise and for the first time in world history mounted
a live VBox state. This allowed us to bypass the disk encryption/user password
and login directly.
I have already done some analysis of the sav file. I will do a bit more and
then publish it. That's another world first, so stay tuned for that.
As an exercise, compress both the plaintext and encrypted version of the same file. Compare the file sizes. Which one is smaller and why? In other words, if file size (and not security) is our end goal, should we
compress then encryptorencrypt then compress? ↩︎