Previously on WinAppDbg-TV:
As usual, code is in my clone on Github. Download that directory to your VM and follow along:
In part two we learned how to hook functions by hooking IE and Firefox to see pre-TLS traffic. Just looking at function calls is fun but often not enough. We need to be able to modify function parameters and return values.
In this part we will learn how to do that (and a few other things). We will start with something simple and then move on to more complex examples.
WinAPI Test
I could not find a real-world example with a simple WinAPI call. I created my own. It's a simple program that calls some WinAPIs.
| |
You can use MinGW to build it on Windows using gcc. If you do not care about this, skip to next section.
You can also use the binaries from the repository test-32.exe and test-64.exe. Run them in a VM, these are binaries made by a random stranger from the interwebz. Ignore the bold words, my integrity is on a par with the blockchain1.
Installing MinGW on Windows
I did not want to install Visual Studio on my VM so I used gcc. I found two different methods. First one allows us to build both 32 and 64-bit executables but second one is 32-bit only. Not that it really matters for our purpose.
I wrote something in my clone about it, use these instructions to install MinGW (or use any other means to build the program):
There are most likely better/easier ways of doing this. If so, please let me know so I can update my notes.
15 - Modify Sleep Call
The test application is very simple. It displays a MessageBox, sleeps for 2 seconds (2000 milliseconds) and then displays a second one. It does not matter which button you choose for the second one, I just wanted to play with different styles.
Why Sleep?
We want to modify the Sleep(2000) call. Why you ask?
I got the idea from this blog post (one of the few places talking about WinAppDbg) by Wizche (Sergio Paganoni).
Let's look at it:
VOID WINAPI Sleep(
  _In_ DWORD dwMilliseconds
);
It's a simple call but most importantly the parameter is just a DWORD. It's not a pointer, meaning if we access it on the stack we will have the actual value. We can just overwrite it with another DWORD and it will work. Don't worry about pointed for now, we will manipulate them later.
tl;dr: Function Calls
- Windows 32-bit stdcall/cdecl: Parameters are pushed to the stack from right to left2.
- This means when we just drop into the function with a
prebreakpoint, we will have the return address on top of the stack and then parameters from left to right.
- This means when we just drop into the function with a
- Windows 64-bit uses fast call: First four parameters are stored in
rcx,rdx,r8andr9. The rest are pushed to the stack from right to left.
Hooking Sleep
We already know how to it with apiHooks.
| |
Modifying Parameters
Hooking is easy, modifying parameters is harder.
To be cross-platform, we need two pieces of information:
thread.get_bits()returns the number of bits in the system. A 32-bit process on 64-bit machine will return 32.thread.is_wow64()returnsTrueif a process is running in emulation mode (32-bit process on 64-bit machine). This will returnFalsefor 64-bit processes and on 32-bit machines.
In a 32-bit process, dwMilliseconds will be the second parameter (after the return address) on the stack after we enter the function (e.g. pre). We can get a pointer to the top of the stack with thread.get_sp() and read them both with the commented out line return_address, dwMilliseconds = thread.read_stack_dwords(2). Note we are reading dwords, in a 64-bit process we must read qwords.
Then we overwrite it with 10000 (10 seconds) with:
process.write_dword(top_of_stack+((bits/8)*1), 10000)- which is
process.write_dword(top_of_stack+4, 10000) - or in asm speak
mov [esp+4], 0x2710(0x2710 == 10000 decimal)
Those calculations are completely unnecessary. But it gives us a formula by showing how to replace the first argument (argument 1 starting from one). For 5th argument we can use top_of_stack+((bits/8)*5 or top_of_stack+20 (20 is decimal here).
In a 64-bit process we just replace rcx with 10000 using thread.set_register("Rcx", 10000).
ModifySleep in Action
The following command will run it:
$ python 15-ModifySleep.py -r test-32.exe
First MessageBox will pop up, after we click OK, applications waits 10 seconds (instead of 2) to display the second MessageBox. No gifs because 10 seconds of not doing anything is boring.
16 - Modify Domain - IE
Now let's change something that is not passed by value. We are going back to our good old friend IE and will redirect one domain to another.
InternetConnect
InternetConnect is what we are looking for. According to MSDN "it opens an HTTP session for a given site" and looks like this:
HINTERNET InternetConnect(
  _In_ HINTERNET     hInternet,
  _In_ LPCTSTR       lpszServerName,
  _In_ INTERNET_PORT nServerPort,
  _In_ LPCTSTR       lpszUsername,
  _In_ LPCTSTR       lpszPassword,
  _In_ DWORD         dwService,
  _In_ DWORD         dwFlags,
  _In_ DWORD_PTR     dwContext
);
We need to change lpszServerName which is a pointer to a UTF-16 null-terminated string (unless you are running some archaic version of Windows, IE will use the Unicode version InternetConnectW).
Step by Step Guide
But this is a pointer, how do we swap pointers? It's pretty easy.
- Hook
InternetConnect. - Check if
lpszServerNameisexample.com. - Allocate some memory in the target process and get a pointer to it.
- Overwrite the location from step 3 with our new data (
synopsys.com). - Swap the pointers.
- 32-bit process: Write our new pointer (DWORD == 4 bytes) to
[ESP+8]. - 64-bit process: Overwrite
rdx.
- 32-bit process: Write our new pointer (DWORD == 4 bytes) to
- ???
ProfitFun3.
Code
| |
This time I hooked the function by number of parameters instead of the signature.
The rest is as we described in the steps.
We read the string that lpszServerName is pointing to with peek_string. Check if it's example.com. If so, we create a new UTF-16 string from synopsys.com and get its length (we will need the length to allocate memory).
Here we see a magic of WinAppDbg. event.get_process().malloc(payload_length) allocates memory in the target process for our string and returns a pointer. We write our new payload to that location with process.write(new_payload_addr, new_server_name).
We swap this pointer with the old one (lpszServerName = new_payload_addr will not work, we need to modify the stack/registers). Because it's the second parameter we write the pointer (which is a DWORD) to [ESP+8] (and Rdx for 64-bit):
- 32-bit:
process.write_dword(top_of_stack + 8, new_payload_addr) - 64-bit:
thread.set_register("Rdx", new_payload_addr)
Corporate Shilling in Action
- Run
$ python 16-ModifyDomain-IE.py -r "c:\program files\Internet Explorer\iexplore.exe". - Go to
example.com. - Embrace the purple.
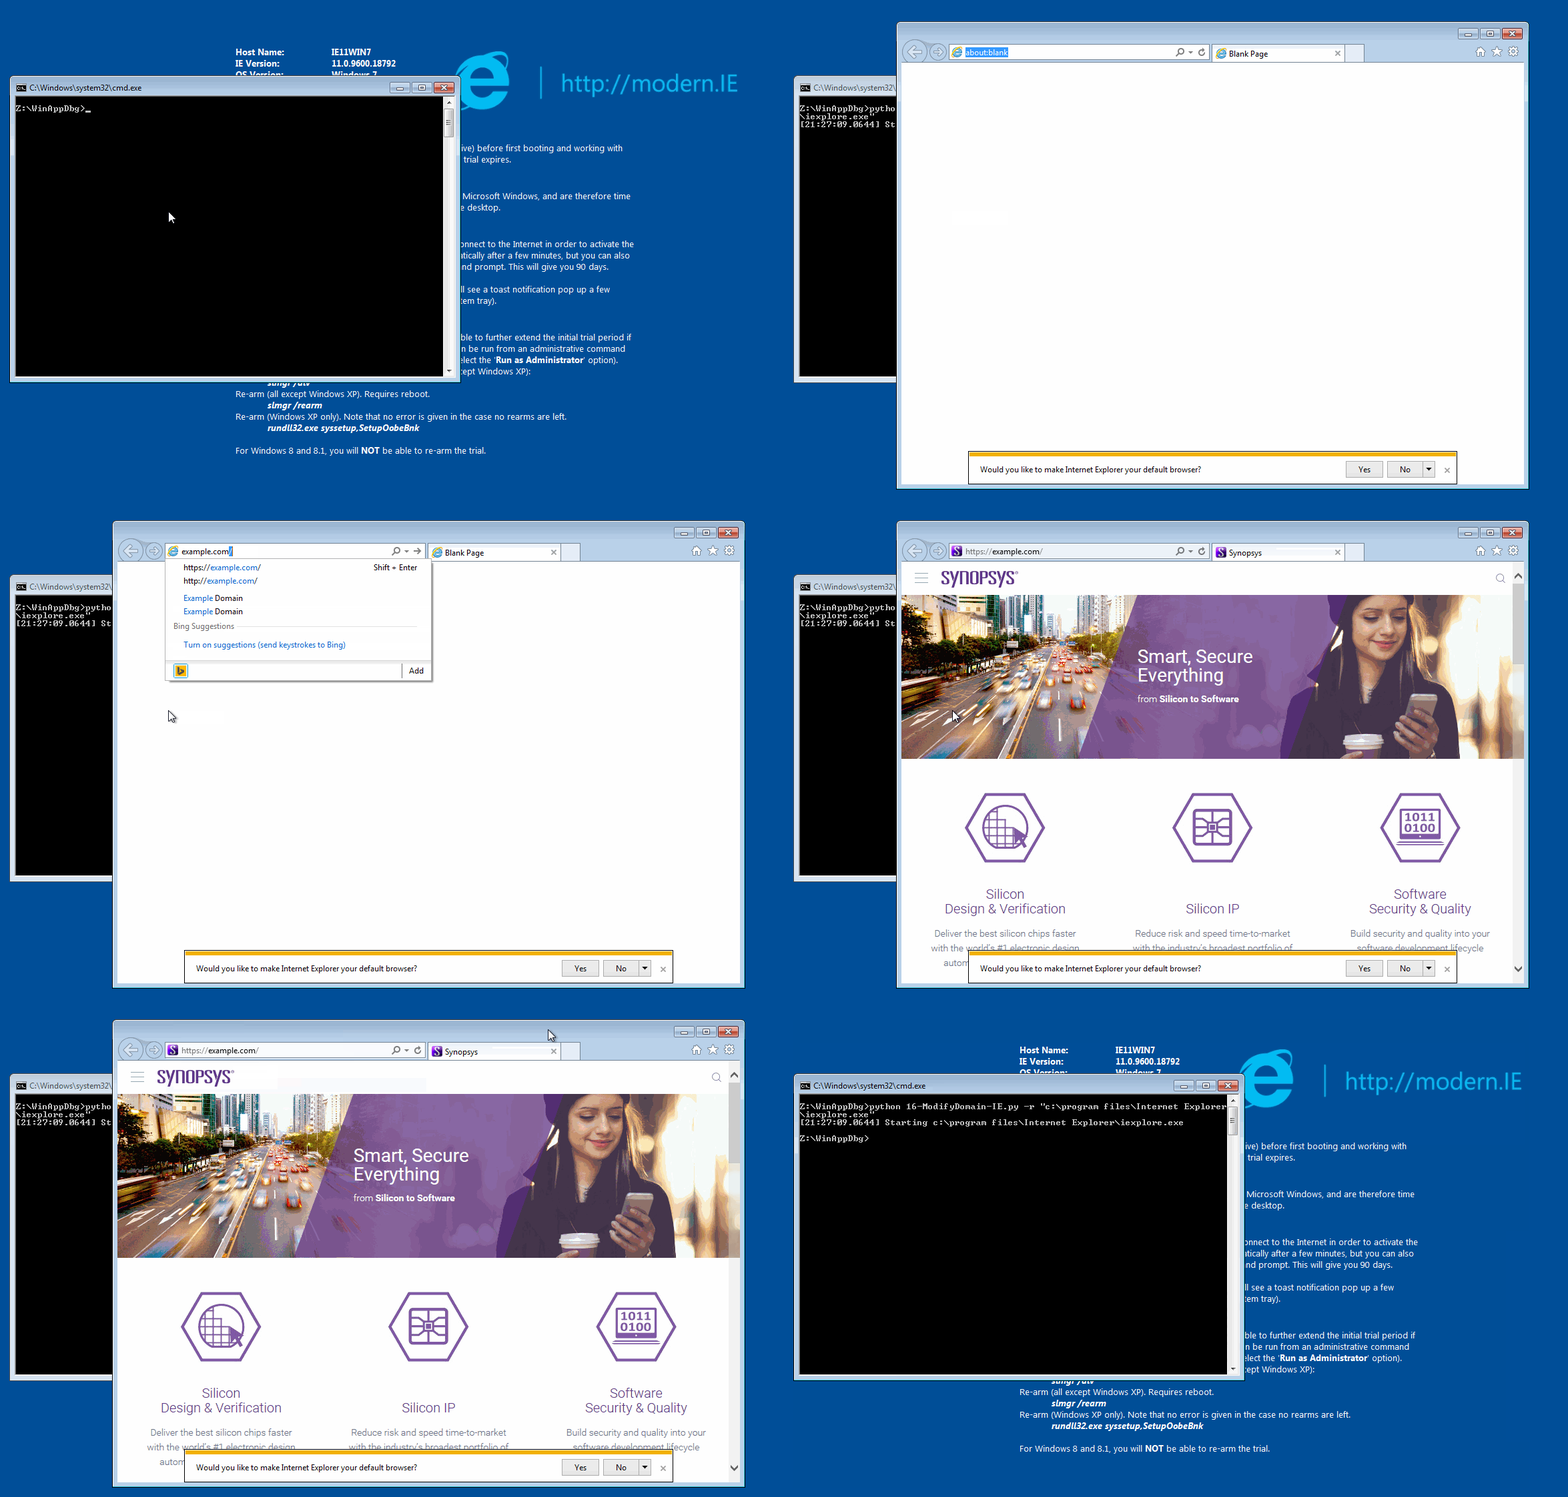 Note address bar is example.com
Now we know to manipulate function parameters. Let's learn about return values.
17 - How calc Preserves its View
For this example I am choosing the famous Windows calc.
calc has different layouts. Standard, Scientific, Programmer and Statistics. Every time we close calc in a specific style, it's saved. First we take a detour to discover how calc saves this configuration and then we will learn how to manipulate it.
Hunt for Layout
As with any other application, there are different ways to save configurations:
- Configuration files: Usually these are either in the program directory or somewhere in
%appdata%orProgramData. - Registry:
- HKCU: Standard user can write.
- HKLM: Only admin can write.
calc's File Access
We use procmon to see if any files are accessed. Filters are (or we can use the Show File System Activity button - see below):
Process Name is calc.exe.Operation is ReadFile.
C:\Windows\Fonts\StaticCache.dat is the only entry and not what we are looking for.
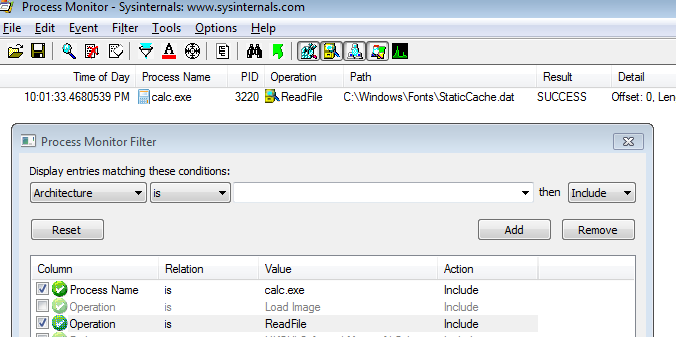 calc file access in procmon
calc's Registry Access
There are some preset filter buttons in procmon. These are pretty useful when trying to do a mass-filter of one type. They are:
Show Registry Activity.Show File System Activity.Show Network Activity.Show Process and Thread Activity.Show Profiling Events.
A note about these buttons: They override manual filters. If you are using specific filters (like we just did for file access), remember to enable all these (except the profiling events). Oyou will miss events otherwise.
 Procmon 'Show Registry Activity' and other buttons
To see calc's registry activity:
- Filter:
Process Name is calc.exe. - Enable:
Show Registry Activity.
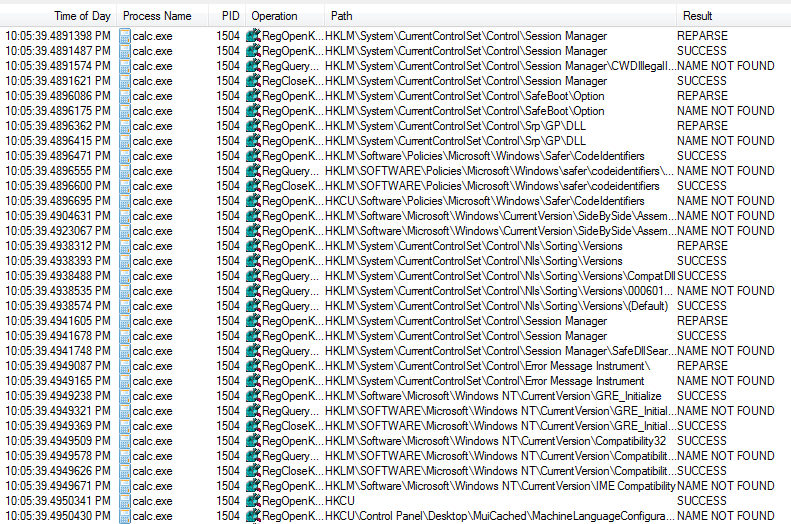 calc's registry activity in procmon
But that's a lot of noise. We need to be clever. We would expect a registry key for calc have "calc" somewhere in its path. Use these filters and re-run calc:
Process Name is calc.exe.Path contains calc.
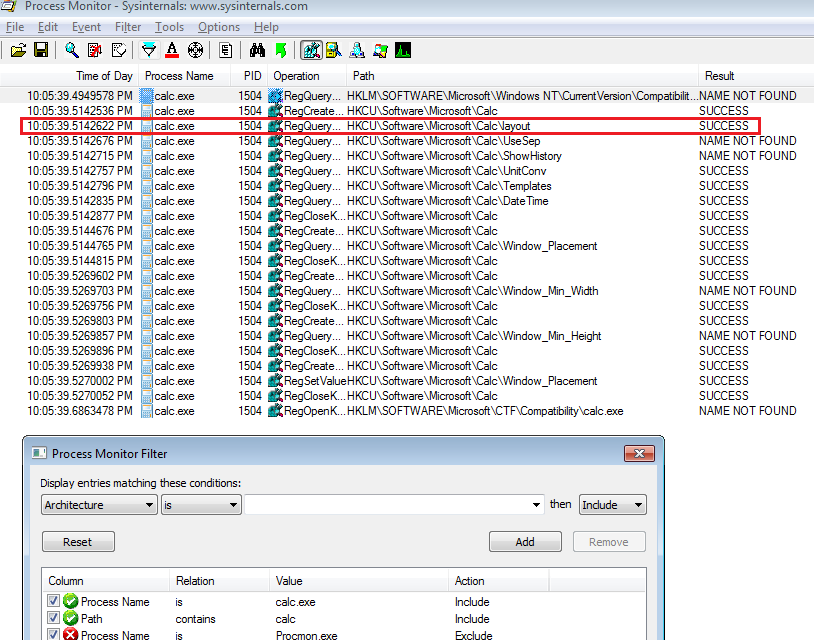 calc's registry activity after path filter
Much better. And we can see key event RegQueryValue HKCU\Software\Microsoft\Calc\layout.
 calc's registry key
Procmon's Call Stack Tab
Now we know what's accessed. We also need to know how it's accessed. Luckily for us, promon is just not for tracing events. We can also analyze events in detail. Double-click on any event and open the stack tab to see the call stack.
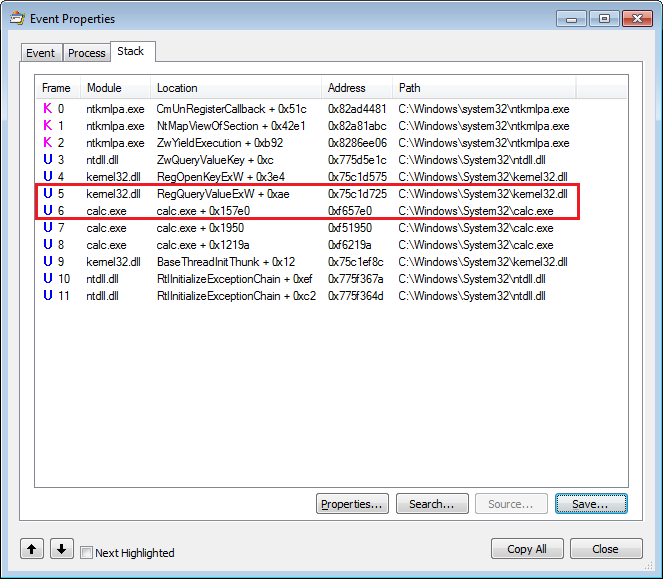 Registry query call stack
| Frame | Module | Location | Address | Path |
|---|---|---|---|---|
| 0 | ntkrnlpa.exe | CmUnRegisterCallback + 0x51c | 0x82ad4481 | C:\Windows\system32\ntkrnlpa.exe |
| 1 | ntkrnlpa.exe | NtMapViewOfSection + 0x42e1 | 0x82a81abc | C:\Windows\system32\ntkrnlpa.exe |
| 2 | ntkrnlpa.exe | ZwYieldExecution + 0xb92 | 0x8286ee06 | C:\Windows\system32\ntkrnlpa.exe |
| 3 | ntdll.dll | ZwQueryValueKey + 0xc | 0x775d5e1c | C:\Windows\System32\ntdll.dll |
| 4 | kernel32.dll | RegOpenKeyExW + 0x3e4 | 0x75c1d575 | C:\Windows\System32\kernel32.dll |
| 5 | kernel32.dll | RegQueryValueExW + 0xae | 0x75c1d725 | C:\Windows\System32\kernel32.dll |
| 6 | calc.exe | calc.exe + 0x157e0 | 0xf657e0 | C:\Windows\System32\calc.exe |
| 7 | calc.exe | calc.exe + 0x1950 | 0xf51950 | C:\Windows\System32\calc.exe |
| 8 | calc.exe | calc.exe + 0x1219a | 0xf6219a | C:\Windows\System32\calc.exe |
| 9 | kernel32.dll | BaseThreadInitThunk + 0x12 | 0x75c1ef8c | C:\Windows\System32\kernel32.dll |
| 10 | ntdll.dll | RtlInitializeExceptionChain + 0xef | 0x775f367a | C:\Windows\System32\ntdll.dll |
| 11 | ntdll.dll | RtlInitializeExceptionChain + 0xc2 | 0x775f364d | C:\Windows\System32\ntdll.dll |
| \ | ||||
Now you are wondering how I made this table. Save... button allows you to save the callstack to a csv file. I fed it to some online markdown table generator. |
This call stack tab is great in many ways.
We can use it to discover which WinAPI was used to read the registry key. Start from line 0 and come down until you get to the first instance of calc.exe (line 6). This is where calc calls the WinAPI which is Kernel32!RegQueryValueExW in next line.
Another piece of very useful information is again in line 6 and that's the Location. This is the address of the instruction after the DLL call (same as the -i switch in ltrace)4. This is super useful when you want to trace back some action in the binary. If we drop calc in IDA Free and go to that address, we can see the function call.
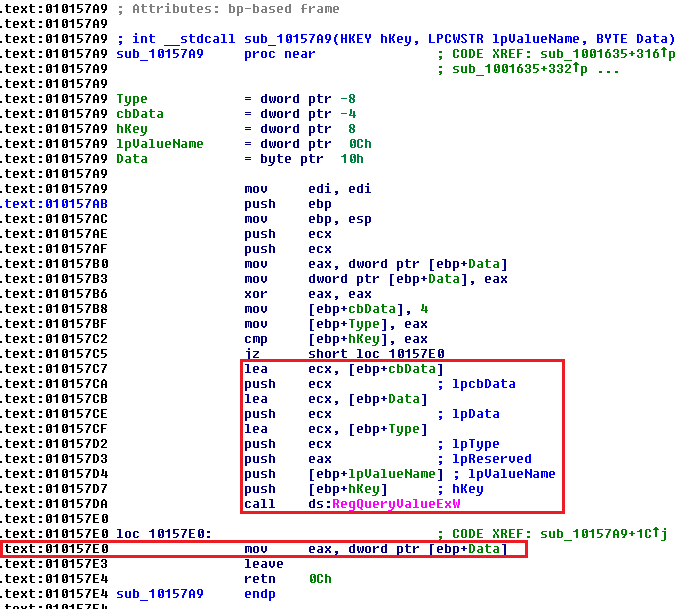 RegQueryValueExW in IDA
We can also see the internal subroutines and their address. This is also useful when we want to trace things internally.
RegQueryValueExW
RegQueryValueExW is the wide version of RegQueryValueEx:
LONG WINAPI RegQueryValueEx(
  _In_        HKEY    hKey,
  _In_opt_    LPCTSTR lpValueName,
  _Reserved_  LPDWORD lpReserved,
  _Out_opt_   LPDWORD lpType,
  _Out_opt_   LPBYTE  lpData,
  _Inout_opt_ LPDWORD lpcbData
);
Unfortunately for me, the return value of RegQueryValueExW is not what it read. It's some ENUM and ERROR_SUCCESS if call succeeds5. My plan to show you how to modify return values is foiled but I am too invested in this to give up. We will modify the "other" outputs.
When we look up the DLL name to start hooking, we see another anomaly. It's listed under advapi32.dll but procmon call stack said it's in kernel32.dll. Aaaaaaaaaand we're back in Raymond's Chen blog again.
DLL Export Forwarding
In an entry named Exported functions that are really forwarders, Raymond explains the concept of "Export Forwarding." Essentially loader silently forwards the call from kernel32 to advapi32. This is a good way to keep exported functions for compatibility reasons but actually implement them in new DLLs (e.g. if your code expects A.dll to export func1 you can implement it in B.dll and forward it).
calc Recon Code
By now you have most likely discovered the registry key that stores the view. But let's do some recon and list all registry calls as a warm-up exercise.
| |
When hooking, we can hook either kernel32 or advapi32. Using kernel32 prints more noise.
Note how we are checking for 0 values in some parameters. These are pointers that might be optional. If we do not check, we will attempt to read memory at address 0 and get errors.
Z:\WinAppDbg>python 17-CalcRecon.py -r calc
[23:32:07.0417] Starting calc
[23:32:07.0467]
keyType         0
valueName       Disable
size            4
data
data-hex        00000000
[23:32:07.0467] ------------------------------
[23:32:07.0477]
keyType         1
valueName       DataFilePath
size            66
data            C : \ W i n d o w s \ F o n t s \ s t a t i c c a c h e . d a t

data-hex        43003a005c00570069006e0064006f00770073005c0046006f006e0074007300
5c00730074006100740069006300630061006300680065002e006400610074000000
[23:32:07.0477] ------------------------------
[23:32:07.0487]
keyType         4
valueName       layout
size            4
data            ♥
data-hex        03000000
[23:32:07.0487] ------------------------------
[output truncated]
Gotcha!
HKCU\Software\Microsoft\calc\layout is what we are looking for. After a bit of experimenting we can document the different layout values6:
0: Scientific1: Standard2: Programmer3: Statistics
We know enough to manipulate the return value and change the layout to what we want.
18 - calc Layout Manipulation
Our battle plan is as follows:
- Hook
RegQueryValueExW. - In
pre_RegQueryValueExWstore the "output pointers" somewhere7. - In
post_RegQueryValueExWmodify theDWORDatlpData(remember it's a byte pointer).- We know it's a
DWORDfrom two places: the registry key type in regedit and the size fromlpcbDatafrom our recon script (DWORD = 4 bytes).
- We know it's a
This is accomplished by this code:
| |
We're telling calc that layout is always 0x00 (scientific). As you can see we can overwrite the memory in two ways:
process.write_dword(self.lpData, 0x00)process.write(self.lpData, "00".decode("hex"))
We could also malloc and do the pointer swap from our IE adventure but it's not necessary here. Our new data still fits in the 4 allocated bytes.
"Scientific" Experiment
Start calc and change the view, notice it saves the view after it's closed.
Now run $ python python 18-CalcLayout.py -r calc and see it always opens in Scientific mode (layout 0).
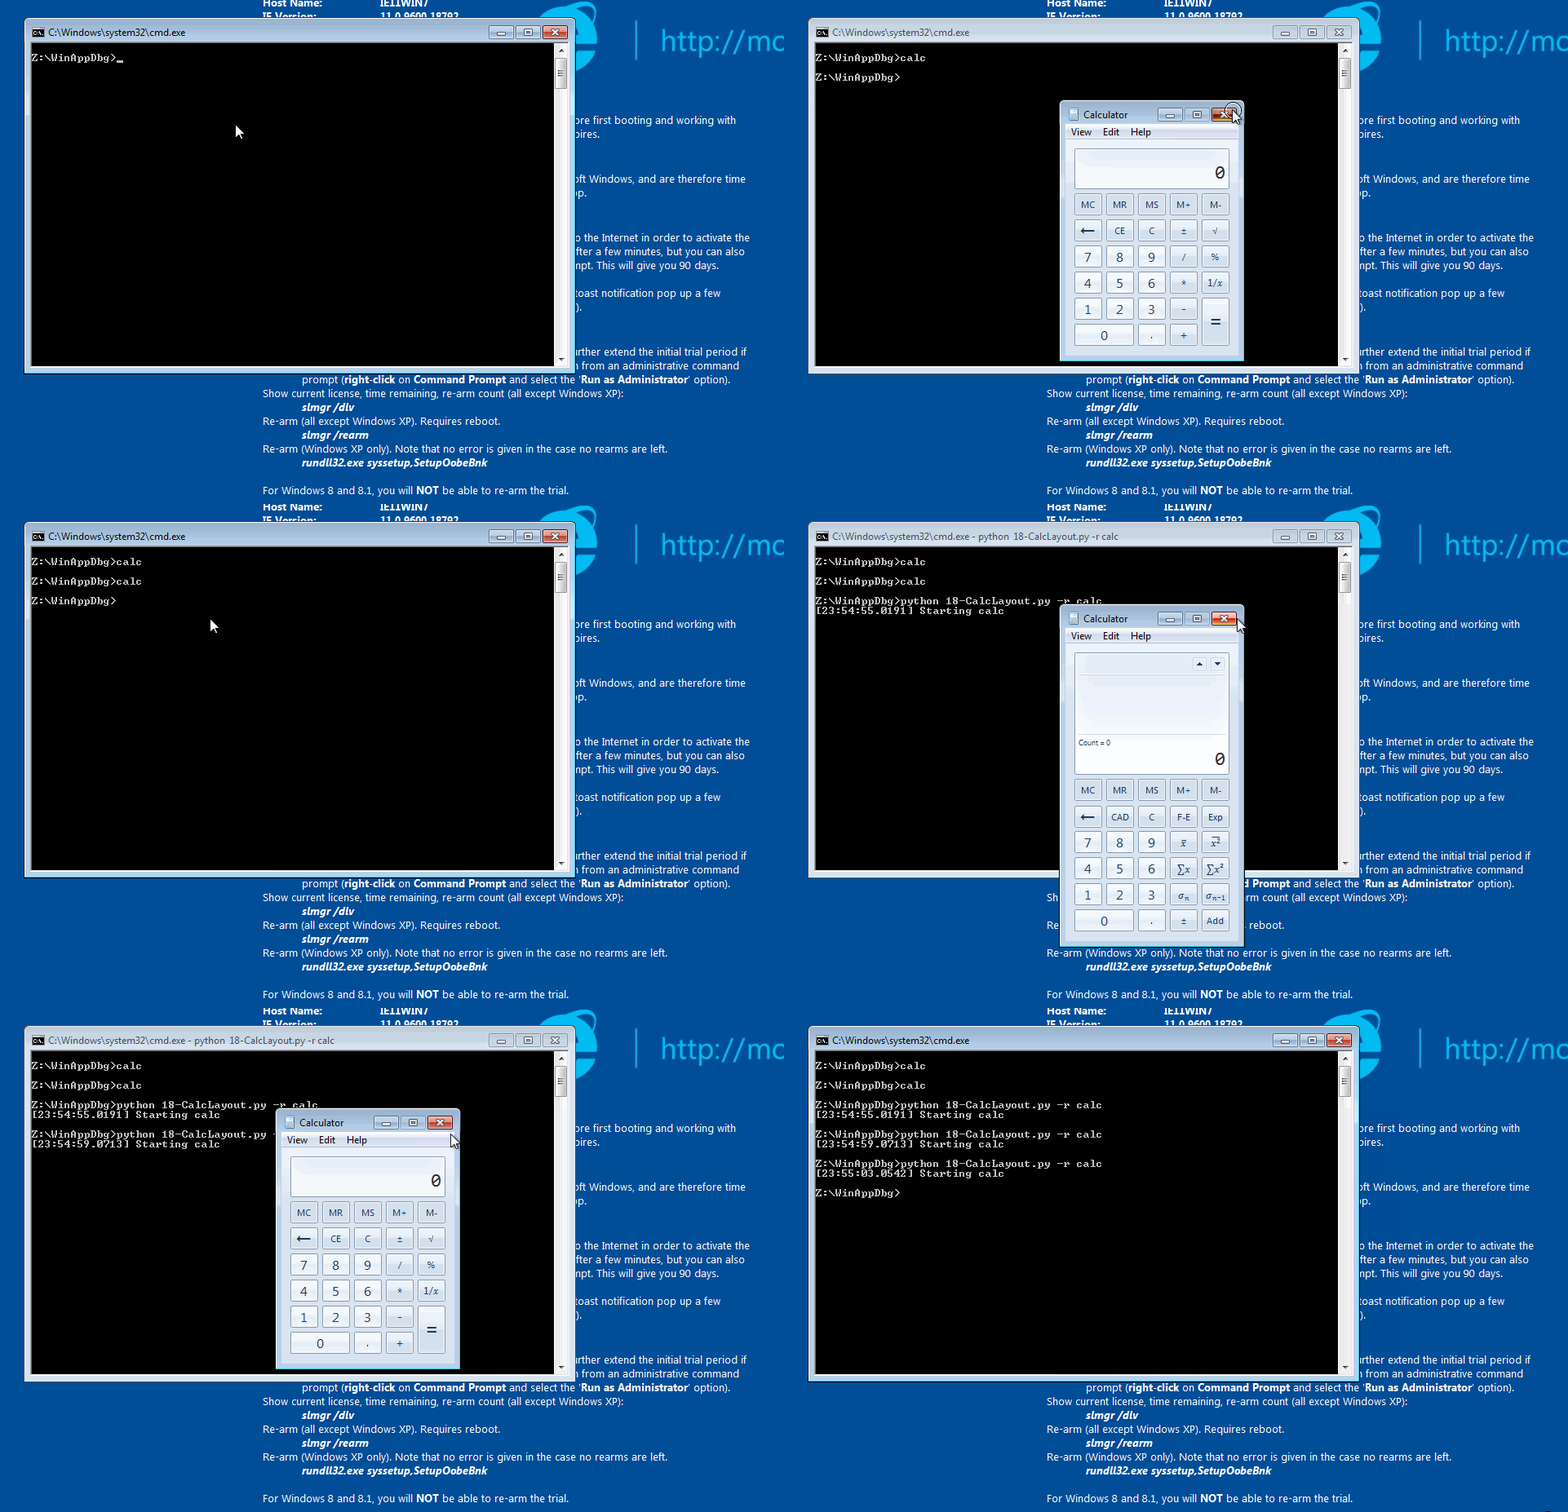 calc always opening in Scientific mode
Conclusion
Now you know how to manipulate function calls and return values. Along the way we saw a few useful procmon tricks and learned DLL Export Forwarding.
But function hooking is not all we can do with WinAppDbg. In part four we will learn how to use to hook internal functions and run arbitrary assembly blobs to solve FlareOn 2017 CTF challenge 3. Until then practice what we learned. As usual, let me know if you have any questions (or spot any errors).
No seriously, run everything in a VM. Also, read this footnote's anchor. ↩︎
In
cdecl, caller cleans up the stack (you will see anadd esp, 4instruction after thecallinstruction). Callee (the function that is called) cleans up the stack instdcall, so you will see the instructions beforeretor justret 4. For more information see The history of calling conventions, part 3 by Raymond Chen. The broken "nice diagrams on MSDN" link is here. ↩︎Actually no profit. This is how I spent my weekend. ↩︎
This is the return address pushed to the stack right before the function call is made. Print the dword (or qword for 64-bit) on top of the stack in the
pre_function to see the same thing. ↩︎Repeat after me ERROR_SUCCESS, ERROR_SUCCESS, ERROR_. ↩︎
For some reason Standard that appears first in the UI is 1 and Scientific is 0. ↩︎
What I call output pointer is one of the tricks to return multiple values in C/C++/etc. If you are familiar with assembly, you know that
eax/rax(orrdx:rax - edx:eaxif it does not fit in one register) contains the return value of a function afterretso you get one return value. I bet that programming languages that allow multiple return values use the same mechanism under the hood. This is just speculation and I could be wrong here; this is another TODO that I need to do later. ↩︎