In part1 I talked about some of Burp's functionalities with regards to testing non-webapps. I did not expect it to be that long, originally I had intended to just shared some quick tips that I use. Now you are forced to read my drivel.
In this part I will talk about Target > Scope, Proxy > HTTP History and Intruder/Scanner. I will discuss a bit of Scanner, Repeater and Comparer too, but there is not much to discuss for the last three. They are pretty straightforward.
1. Scope
Ideally you want to add the application's endpoints to scope, this helps filter out the noise in many parts of Burp.
Adding an endpoint to scope is easy. Right click a request and select Add to scope. Then you can navigate to Target > Scope and see that request added to scope. There is one big catch. Only that URL is added to scope. For example if I select the request to GET Google's logo and add it to scope, the rest of Google.com will not be in scope and have to be added manually.
 Adding Google's logo to scope
Another way is a to copy the URL and then paste it. If we right click on any request almost anywhere in Burp (HTTP History, Repeater, Intruder, etc.) we can copy that request's URL to clipboard through Copy URL context menu option. We can use the Paste URL button to paste it to scope. This button appears in other places in Burp and can be used in a similar manner.
 Using Paste URL to add items to scope
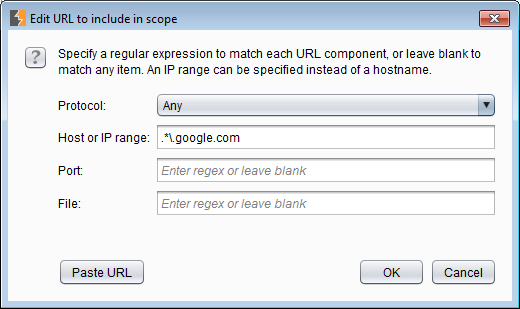
We usually do not want to only have one request in scope. Usually it's either the whole endpoint (*.google.com) or a certain directory (google.com/images/). Luckily for us we can use regex when assigning scope. What I usually do is to add a URL to scope via one of the above methods and then modify the scope by using the Edit button.
There are four options in scope:
- Protocol: Can be
Any,HTTPorHTTPS. I usually go withAny. - Host of IP range: Supports regex as we have seen. For example
*\.google.com. - Port: Unless I am looking for traffic in a specific port, I usually keep it empty. Empty means it does not filter anything by port. Supports regex.
- File: This is the rest of the URL minus the domain. Supports regex.
If we want to add Google and all its subdomains in scope, we add the logo (or any other item from Google) to scope and then edit it.
 Adding `*.google.com` to scope
2. HTTP History
Proxy > HTTP History is where we see all captured requests/responses in Burp. Roughly half of my time in Burp is spent here. One big part of the history is using the filter to reduce the noise. The filter can be opened by clicking on the tab with the text Filter: Showing all items (depending on your settings you may see a different text). I usually like to start with a clean slate.
 HTTP History filter options
The most effective item in reducing the noise is selecting Show only in-scope items. This will hide anything not in scope. Let's see it in action:
 Hiding out of scope items
As you can see in the screenshot, the filter has a good number of options. Most of these options are simple to use. I am going to point out the ones that I usually use in non-webapps.
- In
Filter by MIME typekeep everything active until you are sure you are not losing any requests. The MIME-type is not always stated correctly in responses. TheOther binaryis needed to see most binary or unusual payloads (it is not active by default). - In
Filter by file extensionI only use theHidefeature and usually add some extra extensions to it (for example fonts) that I am not interested in. Filter by listeneris especially useful when the an application is communicating on different ports and does not support proxy settings. In these cases we have to redirect the endpoint to localhost (for example using thehostsfile) and create a different proxy listener for each port. Using this feature we can see traffic for select listeners.
3. Scanner (only available in Pro version)
The Burp has a decent scanner. It is not as good as IBM Appscan Standard in terms of coverage and accuracy but it has a lot advantages especially for non-webapp testing.
- Burp is much easier/faster to set-up. I can login, scan a single request and be done with it. While in Appscan I have to do the whole app at once (configure the scan, record login sequence, manual explore, automatic explore and then finally full scan). This does not take into account the fact that more often than not I have to troubleshoot Appscan because it cannot record some special login (you are shit out of luck if login needs a random token) sequence.
More rants about Appscan. - Burp is much cheaper. $300/year for Burp vs. $20,000/year for Appscan.
Results appear in Issue activity tab (a better place to observe the results is Target > Site map) and requests being scanned are in Scan queue.
3.1 Live Scanning
Burp has two scanning modes: active and passive. Both can be active at the same time.
In passive scanning, it just looks at requests/responses and essentially greps according to its rule set without sending any requests. In active scanning, it actually generates payloads and sends them to the server (and analyzes requests/responses).
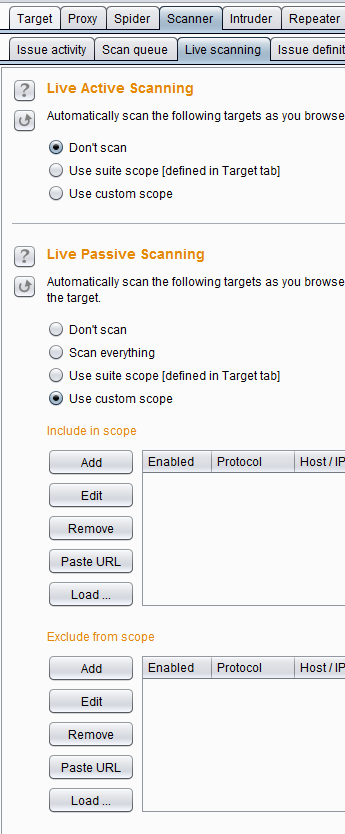
In this tab you can configure these modes:
- Never turn
Live Active Scanningon. Seriously don't. You are going to wreck something or get locked out of the application. Always scan each request individually. - Setting
Live Passive ScanningtoScan everythingis fine but increases noise in scan results. If you have setup the scope (which you should have) properly you can set it toUse suite scope. You can also selectUse custom scopeand select a scope similar to the scope tab but is not needed most of the time.
 Live scanning options
3.2 Options
Here you can configure the scanner options. Although I do not use live active scanning, these options need to be configured for individual request scanning.
Attack Insertion Points: You can select injection points. Add/remove as you like. Fewer injection points == faster scanning.Active Scanning Engine: Throttle the scanner for slow servers or when you get IP-banned if you send more than X requests per minute.Active Scanning Areas: As you can see, these options are more geared towards webapps. I de-select everything and just add the ones that I think are relevant. This saves a lot of time during scanning.Passive Scanning Areas: You can de-select everything and only add relevant items to reduce the noise but honestly I do not bother to change this.Static Code Analysis: Enables static analysis on JavaScript code. You can drop this for most non-webapp tests.
4. Intruder (rate limited in Free version)
Intruder is the semi-automatic scanning part of Burp. Right click on any request and select Send to Intruder. In Intruder you can designate injection points and then either scan them using the internal scanner or use your own payloads.
4.1 Positions
After sending the payload to Intruder open up the Intruder > Positions tab and see the injection points. I usually just Clear everything and then use the Add button to highlight my own injection points.
 Using Burp Intruder
As you can see, I selected the familiar Google logo request and sent it to Intruder. Then cleared all pre-defined injection points and added the file name. Now we can right click and select Actively scan defined insertion points which sends this request to the Scanner but only scans this injection point or I can use the Start Attack button to start injecting my own designated payloads into this injection. As I have not selected any payloads, the second option does not work yet.
4.2 Payloads
Now we can set our payloads for the custom Intruder attack. Switch to the Payloads tab.
4.2.1 Payload Sets and Payload Options
Here we can use different payloads. Burp has some complex payload sets that you can use in special circumstances. For example there is Recursive grep, which means that you can grab each payload from the response of the previous payload. Case modification, Character substitution, Dates and Numbers are some of the others.
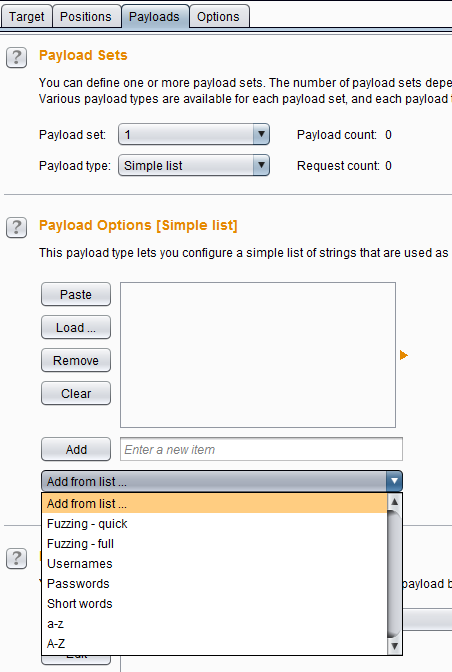
Simple list allows you to use your own payloads for all injection points. Copy all the payloads from a source (it's one payload per line) and paste them in Payload Options. You can also directly use the payloads in a file by selecting Runtime file. Using a file is the same as clicking the Load button and loading the file. You can also use some of Burp's internal payload lists which I think are only available in the Pro version.
 Simple list and Burp's internal payloads
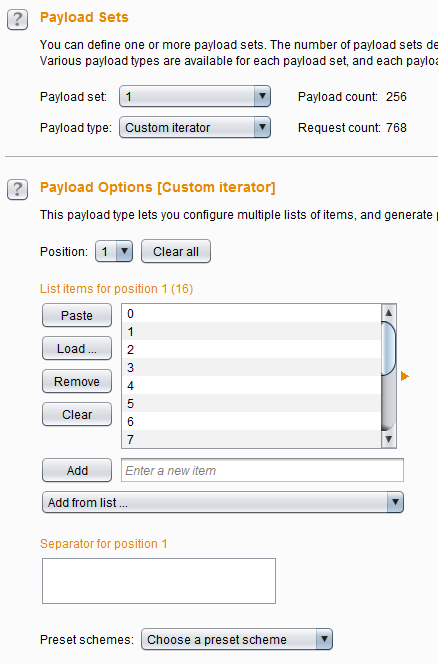
The Custom iterator option allows Burp to do generate more complex payloads. For example if I want to simulate two bytes in hex (four characters). I select position one, add items 0-9 and a-f to it, then select positions 2-4 and do the same. Burp allows you to have eight positions. If you want to add usernames after that, I can select position five and add my list of usernames. As you can see it also supports separators between positions.
 Custom iterator
One popular payload list is FuzzDB at https://github.com/fuzzdb-project/fuzzdb. Be advised that it contains some payloads that are flagged by most Anti-Virus software.
4.2.2 Payload Processing
Allows you to transform the payloads before injection. For example you can encode all payloads to base64 or send their hashes instead.
 Payload Processing
4.3 Options
We can throttle the Intruder (similar to the Scanner) in Request Engine or delay it.
Payload Encoding instructs Burp to URL-encode special characters.
4.3.1 Grep - Match
We can grep for specific items in the responses. For example if we have injected SQLi payloads, we can instruct Burp to search for words in SQL error messages. For XSS I usually use payloads that inject 9999 (e.g. alert(9999)) and then grep for 9999 in responses.
FuzzDB has its own regex patterns to analyze the responses. This page shows how to use them in with Burp.
5. Repeater - Decoder - Comparer
While these tabs do not have a lot of functionalities, they are quite useful.
5.1 Repeater
Repeater is where manual testing happens. Scanner is automated scanning and Intruder is semi-automated.
In order to send a request to repeater, right click and then select Send to Repeater. We can modify requests, forward them and observe the responses.
Here I choose the logo GET request, send it to Repeater and forward it. Then modify it to grab some invalid file and see the 404 response. Then undo the change with Ctrl+Z to revert to the original request.
 Using Burp Repeater
Note than you can send modified items from Repeater to Intruder for scanning.
5.2 Decoder
Allows encoding/decoding to different formats. Also supports creating hashes. Double click any parameter to select it and then right click and select Send to Decoder. You can also select and item and copy it by pressing Ctrl+C and then paste it in decoder.
 Using Burp decoder
5.3 Comparer
Comparer is used for comparing two payloads and HTTP requests/responses. Again select, right click and Send to Comparer. Comparing can be done at a byte (for binary blobs) level or by words (usually for text).
That was it, in the next part I will talk about the items in the Options menu.