Burp is not just used for web application testing. I usually use it during mobile and thick client tests. If the application is using HTTP methods then Burp is your best friend.
I am going to document a bunch of Burp tips and tricks that have helped me during my work. One purpose is to share it with the world and not be the other guy from Wham! (:D) and the other is to have it in an accessible place (similar to the cheat sheet in the menu).
This part one I talk about Interception and Proxy listeners which are configured via Proxy > Options.
At the time of writing the current version of Burp Pro is 1.6.39 and most items should apply to the current Burp Free version (1.6.32). Most settings have not changed since I started working with Burp (v1.5). You can download Burp from: https://portswigger.net/burp/download.html.
When I started this, I did not think I have so much stuff to write about Burp. So I broke it into multiple parts. Please note that these series of posts are not targeted towards web application testing so I have skipped some functionalities. If you have any favorite tips or usecases and want them included with credit please let me know, as usual feedback is always welcome.
1. Interception
Burp supports request/response interception and modification. You can configure most of these settings in Proxy > Options.
1.1 Intercepting Responses
Sometimes you want to intercept the response for manual modification. Enable it at Proxy > Options > Intercept responses based .... Be sure to remove the checkbox on the first rule, otherwise binary payloads may not be intercepted.
 Intercepting responses
1.2 Intercepting Request/Responses Rules
Burp supports rules for intercepting requests/responses. This is extremely useful when you have redirected a lot of traffic to Burp (e.g. using the IE proxy settings) but only want to intercept traffic for some specific endpoints. Go to Proxy > Options and see the rules Intercept Client/Server Requests. There is a pre-defined rule to only intercept requests in scope. You can also add your own rules and it supports regex to match the content and headers.
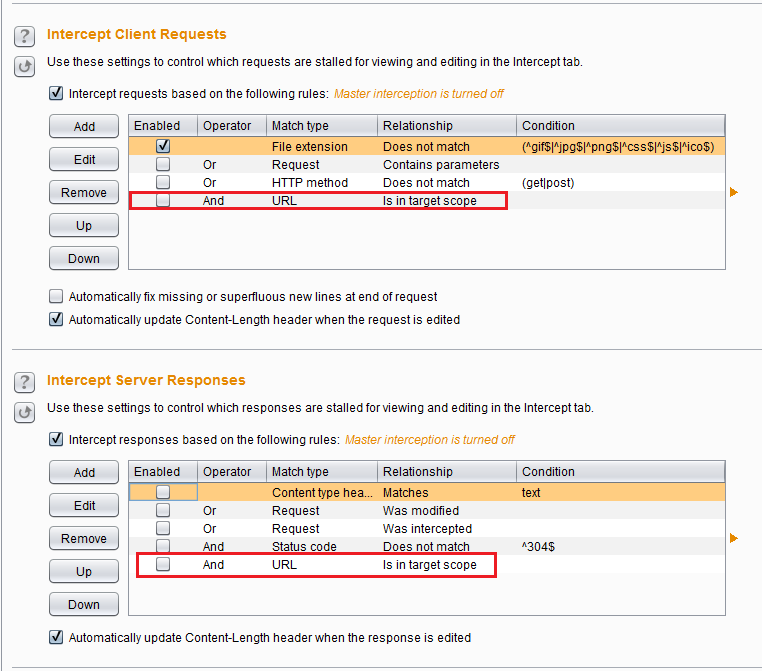 Intercept rules
1.3 Match and Replace
You can do match/replace under Proxy > Options > Match and Replace. Meaning that you can replace something in the request or response with something of your choice. It supports regex too. I usually use it to change the User-Agent (see the default rules or add your own User-Agent). Another way is to automatically change something in the response to bypass client-side controls without patching the binary. For example if the server responds to the login with true/false, I make a match/replace rule to modify the bad login response to true and bypass login (this will only work if the server does not care that your login was not successful).
 Match and replace rules
1.4 SSL Pass Through
This is an underrated functionality of Burp (Proxy > Options > SSL Pass Through). Burp will not MitM anything added to this section and just act like a non-terminating TLS proxy.
Suppose you are trying to proxy something but it doesn't work. You add the endpoints to SSL Pass Through and see if the problem is with Burp.
This frequently happens with thick clients that use a mix of HTTP and non-HTTP protocols to talk to different endpoints. Burp will MitM the non-HTTP connections and may silently drop or modify packets. This will cause the application to malfunction. First identify the endpoints and then add them to SSL Pass Through. For a practical example see Proxying Hipchat Part 2: So You Think You Can Use Burp?.
You can use this functionality to use Burp as a quick and simple port changer. Let's say that you want to connect a client that sends data to port 1234 to a remote server that is listening on port 5678. If you do not want to write code (or use other utilities) to redirect ports. Set up Burp as proxy on port 1234, redirect the endpoint to localhost using the hosts file (or other OS specific methods). In Burp you can set the proxy to redirect all traffic to the endpoint using the Request Handling functionality and a different port. The add the endpoint to the SSL Pass Through.
1.5 Response Modification Options
Most of these are self explanatory and are mostly only useful for web applications.
Convert HTTPS links to HTTP and Remove secure flag from cookies fit nicely with the Force use of SSL in Request Handling. If we have disabled TLS between the application (or browser) and Burp, a Secure cookie will not be transmitted and the app will stop working. Burp can remove the Secure flag when it is set using the Set-Cookie response header.
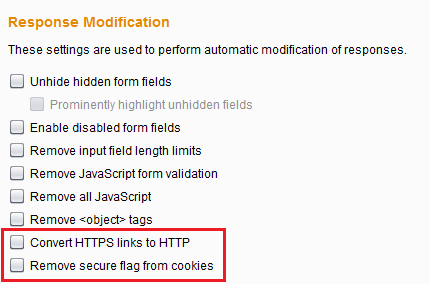 Response modification options
1.6 Disable Intercept at Startup and Miscellaneous
I run Burp and set it up to proxy, run the application and wonder why it is stalled. Then I realize that by default intercept is on at startup.
Proxy > Options > Scroll all the way to the bottom > Under Miscellaneous > Enable interception at startup > Always disable.
 Interception startup settings
2. Proxy Listeners
Burp listens on a port. This is the port that you forward the traffic too. The default settings is 127.0.0.1:8080 but it can be changed. You can also make new proxy listeners on other interfaces or all interfaces 0.0.0.0. The only restriction is that another program cannot be using that port on the selected interface.
Proxy listeners can be accessed from Proxy > Option > Proxy Listeners (on top).
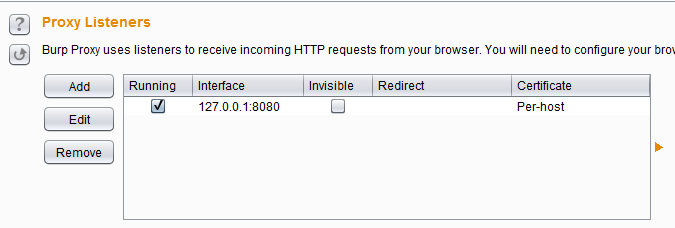 Proxy listeners
2.1 Binding
Adding a new listener is easy, just click thr Add button. Loopback is 127.0.0.1 or localhost. If you want Burp to listen on another interface, it can be chosen here. This is useful if I am proxying a mobile device. In this case I will create the listener on all interfaces (0.0.0.0) or the network interface that is shared with the mobile device (e.g. a Windows hostednetwork).
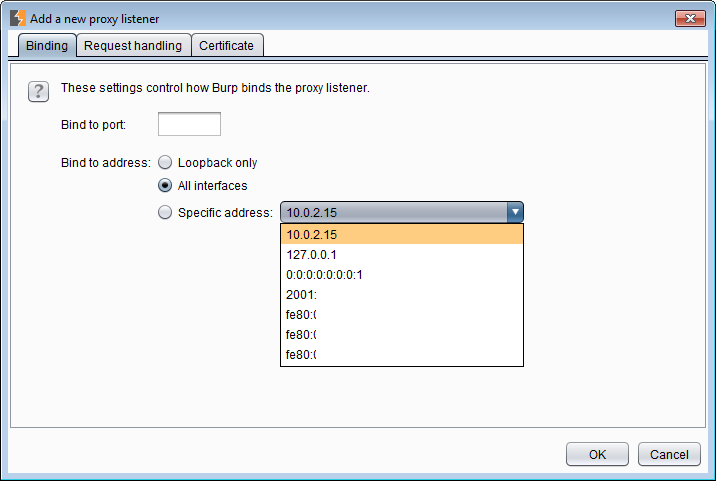 Proxy binding
We can import/export Burp's root CA using the Import/export CA certificate or use Regenerate CA certificate to create a new one. For more information read this post: Installing Burp Certificate Authority in Windows Certificate Store. If you regenerate the root CA, you have to replace the old one in the certificate store (of OS and browsers like Firefox) with the new certificate.
2.2 Request Handling
This is a useful feature for non-web applications. Supposed I have proxied a thick client application which connects to www.google.com:8000 by using the Windows hosts file. In that file, www.google.com is redirected to 127.0.0.1 and I have created a Burp listener on port 8000. Now I need to redirect all traffic from this listener back to the original endpoint (www.google.com:8000). One way of doing this is this section Redirect to host and Redirect to port will contain www.google.com and 8000 respectively.
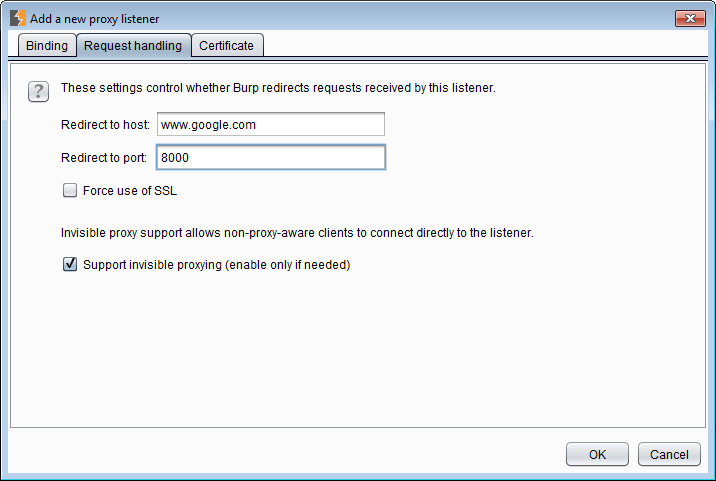 Redirecting traffic to www.google.com:8000
If the application is connecting to different endpoints on the same port (e.g. if we wanted to proxy traffic going to port 80 or 443), then we cannot redirect the traffic in here. We need to use Options > Connections > Hostname Resolution. We will get to this part in next parts.
This is also useful if I am using Burp to pipe the traffic to another proxy tool such as Fiddler or Charles.
The Force use of SSL option is used when I am stripping TLS between Burp and the application and want to add it from Burp to the endpoint. One documented instance is when I used it with SOAPUI.
2.2.1 Burp's Invisible Proxying
For more information please see Hipchat part 3 and read sections 2.2.1 and 2.2.2. To be honest read the whole series to see how Burp works as a proxy. You will evade so many problems down the road.
If we have proxied a client and the client is proxy-aware it will send a CONNECT request to the endpoint that it wants to connect to (in this case www.google.com) before starting the actual TLS connection. This is to tell the proxy where to redirect the traffic. This is because the proxy (which in most cases is a non-TLS terminating proxy unlike Burp) cannot see inside the TLS encrypted TCP payload in the packet. As a result it does not know where to send this traffic. This CONNECT request solves this problem. Example of proxy aware clients are browsers.
Non-proxy-aware clients, don't know (or don't care) that they are proxied. This is the case for most applications that either do not have proxy settings or do not use the OS proxy settings. The application still thinks that it is sending information to the endpoint but it is being redirected to Burp. Burp being a TLS terminating proxy can decrypt the packets and look inside them to discover the original endpoint by reading the host header. This is Burp's invisible proxying.
It can be enabled at Proxy > Options. Select the proxy listener, click edit and under Request Handling select Support invisible proxying (enable only if needed).
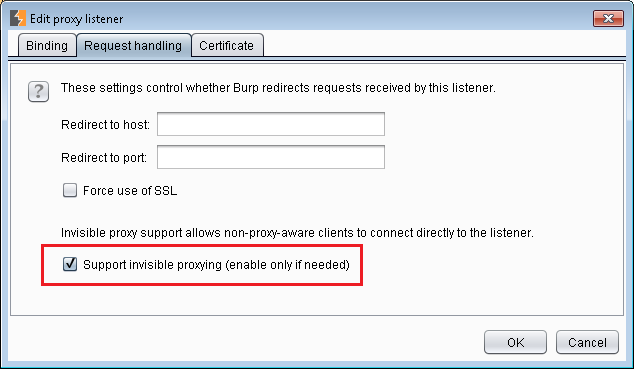 Burp invisible proxying option (copied from Hipchat part 3)
What I usually do is capture the local traffic between the application and Burp (using RawCap) and see if the application sends the CONNECT request. If so, then this is not needed. Another way is to just try both settings and see which one works ;).
2.3 Certificate
We can configure how Burp's MitM certificate here.
Use a self-signed certificate: This means that Burp only uses one single certificate for all connections.Geneate CA-signed per-host certificates: This is the most common. Burp will generate a different certificate for each host. The Common Name (CN) for the certificate is the same as the domain name.Generate a CA-signed certificate with a specific hostname: We can specify the CN in the certificate. This is useful when an application is doing certificate pinning by checking the CN but it is different from the endpoint usually using wildcards. For example the application is connecting toimages.google.combut it is looking for a certificate for\*.google.com. If we choose the last option, Burp will create a certificate forimages.google.com(because that is the endpoint) and the certificate pinning mechanism will reject the certificate.Use a custom certificate (PKCS#12): If we have a certain certificate (including the private key) that we need to use, we can use it here. This is useful when the certificate pinning mechanism is checking for more than CN, so we generate a certificate manually (or if use the original certificate if we have access to it) and use it here.
3. Bonus tip: Running Burp with a Set Amount of Memory
Personally I have never had any problems with Burp running out of memory. But I usually save my Burp states at the end of the day and do not use a lot of Python/Ruby extension but YMMV.
Run this via command line to assign 2048 MBs (or 2 GBs) of memory to Burp:
java -jar -Xmx2048m /burp_directory/burpsuite_whatever.jar.