Finally we are at part 3 of proxying Hipchat. This has been quite the adventure. In part1 we identified the endpoints. In part2 we answered the question “So you think you can use Burp” with yes and proxied some of Hipchat's traffic with Burp.
In this part we will talk about developing our own proxy in Python to view Hipchat's traffic to/form hipchatserver.com (our example Hipchat server). First we are going to discuss how proxies work and we will get over Burp breaking our heart by creating our own proxy in Python to observe and dump the traffic in plaintext.
Related (crappy) code is at now in my clone at:
For a similar effort (although with a much more complex proxy in erlang) look at http://blog.silentsignal.eu/2015/10/02/proxying-nonstandard-https-traffic/.
-1 Breaking Atlassian's EULA
Go to your Hipchat server's web interface login page and view that page's source. The same thing appears in http://downloads.hipchat.com.
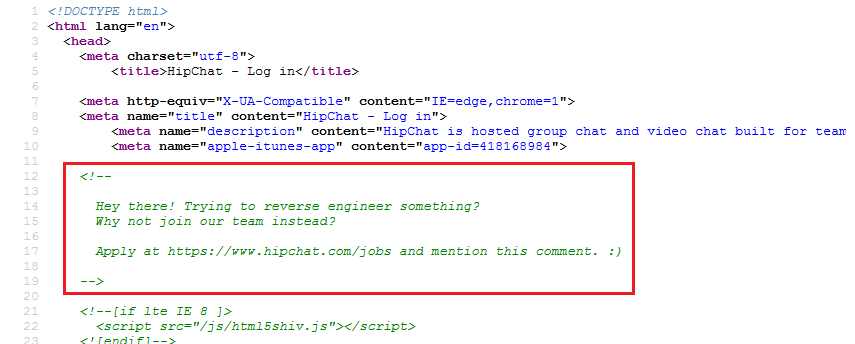 Reverse engineering intensifies
Oops we just broke someone's EULA. Note to people from the future: This is a fresh an already stale Oracle meme (at the time of writing). For more information read an archived version of the article. https://archive.is/xmtoW#selection-283.0-287.757 (you can link selected text in archived web pages, what a time to be alive).
0. Ingredients
I am going to continue where we left last time. I assume you have proxied Hipchat with Burp and have a general idea of what is happening here.
We will need Python. I am writing my code in 2.7.x because why not? But it should be easily portable to 3.x if not as it is. There are no dependencies as we will only use two standard libraries socket and ssl.
We will also need OpenSSL or another way to create a Certificate Authority (CA) and a signed TLS certificate for hipchatserver.com.
1. Hipchat Update
Since last part, Hipchat has been update to version 2.2.1395. If we start Hipchat, we can see one extra request in Burp as follows:
https://www.hipchat.com/release_notes/client_embed/qtwindows?version_num=1388
.
1388 is our current version number before update. This request retrieves the patch notes for all released versions after 1388 which is basically an HTML page (with some JavaScript in the header that will not be executed as we have seen before).
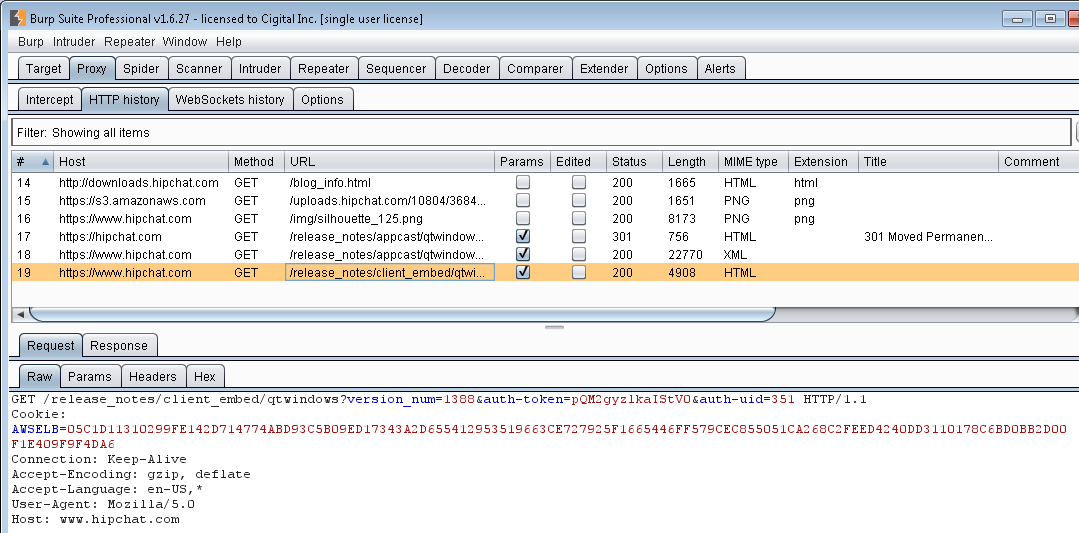 Request to retrieve patch notes
Let's update and see what happens. The application sends a GET request to retrieve the new installer from https://s3.amazonaws.com/downloads.hipchat.com/windows/HipChat-2.2.1395-win32.msi, and then executes it. After logging in we can see that the requests logged in Burp have not changed from last update.
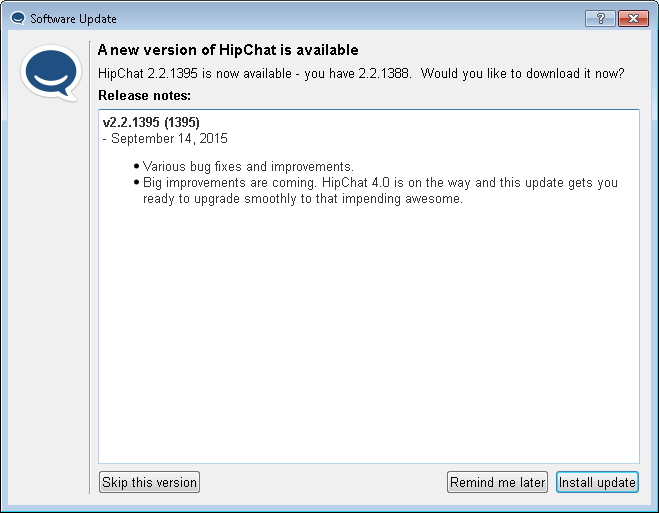 Patch notes in Hipchat
2. How does a Proxy Work?
In order to create our own proxy, we must know how proxies work. We have all used Burp before but we don't really care what happens under the hood until something goes wrong.
At first look Burp stands between our browser and the server, It receives requests from the browser, relays them to the server and vice versa. But it does a lot more than that. In order to exactly see what happens we need to look at network traffic or in other words pcap or it did not happen. But capturing this traffic a bit tricky as Hipchat's traffic to Burp is local so Wireshark/Netmon cannot record it. To demonstrate Burp in action I had three choices:
- Use Microsoft Message Analyzer to capture both sides of traffic.
- Good: Capture everything in one go.
- Evil: Proprietary format that cannot be opened by Wireshark. Readers have to install the tool (and let's be honest no one looks at these files anyway :D).
- Capture browser's traffic to Burp via RawCap and Burp's traffic to the server with Wireshark.
- Good: We have seen the request and can see them in Burp.
- Evil: Difficult to create. Have to use two applications.
- Hook up a mobile device and set Burp as Proxy. The try to view something on the mobile device and capture the traffic on machine running Burp.
- Good: Very easy to create.
- Evil: Readers cannot relate.
I went with the second option. There was however one problem, the timestamps on packets in Wireshark were exactly 4 hours ahead of RawCap (and we are -4 GMT so you can guess why). Usually this is not a problem in a capture because packet sequences are more important that the exact timestamp (I don't do forensics). I used Wireshark's timeshift to set them back and then merged both files.
Now let's see how Burp works. Let's look at the capture file in Wireshark.
2.1 GET downloads.hipchat.com/blog_info.html
Click for full-size image. Doesn't apply anymore as I don't have imgpopup in Hugo. Here's a link to the full-size image.
 GET blog_info.html in Wireshark
In other words:
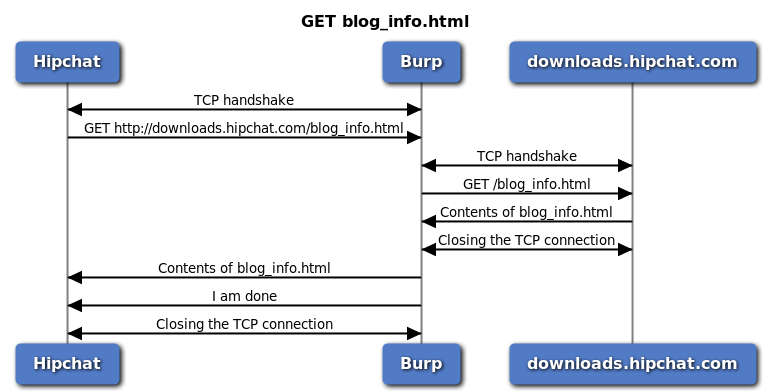 GET blog_info sequence diagram
In other other words:
- Hipchat creates a TCP connection to Burp.
- Hipchat sends the GET request to Burp.
- Burp creates a TCP connection to Server.
- Burp sends the GET request to Server.
- Server send the web page to Burp.
- Burp closes the TCP connection to Server.
- Burp sends the web page to Hipchat.
- Burp closes the TCP connection to Hipchat.
Some notes:
- After the TCP handshake, each request will have an ACK.
- Hipchat is initiating to close the TCP connection in both cases.
- Both connection are closed correctly (FIN) instead of RST. FIN means “I am done with the connection but will listen to what you are saying until you confirm it with another FIN” while RST forcibly closes the connection.
2.2 GET s3.amazonaws.com/uploads.hipchat.com/…/freddie.png
This one is different because it is over TLS.
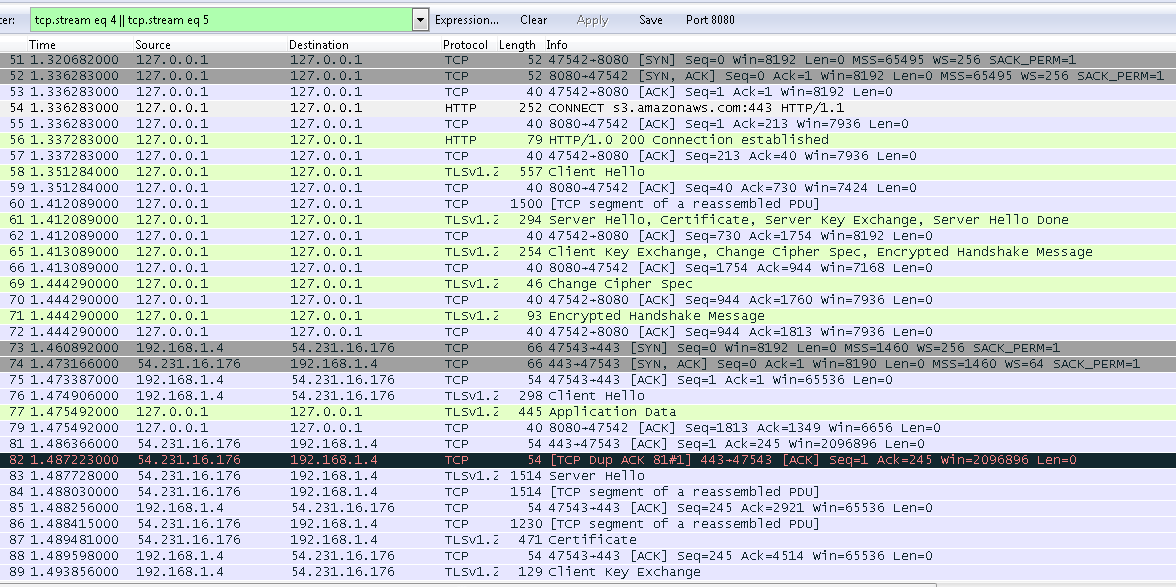 GET Freddie.png in Wireshark
I am not going to mark the Wireshark screenshot this time. Because the sequence diagram explains everything:
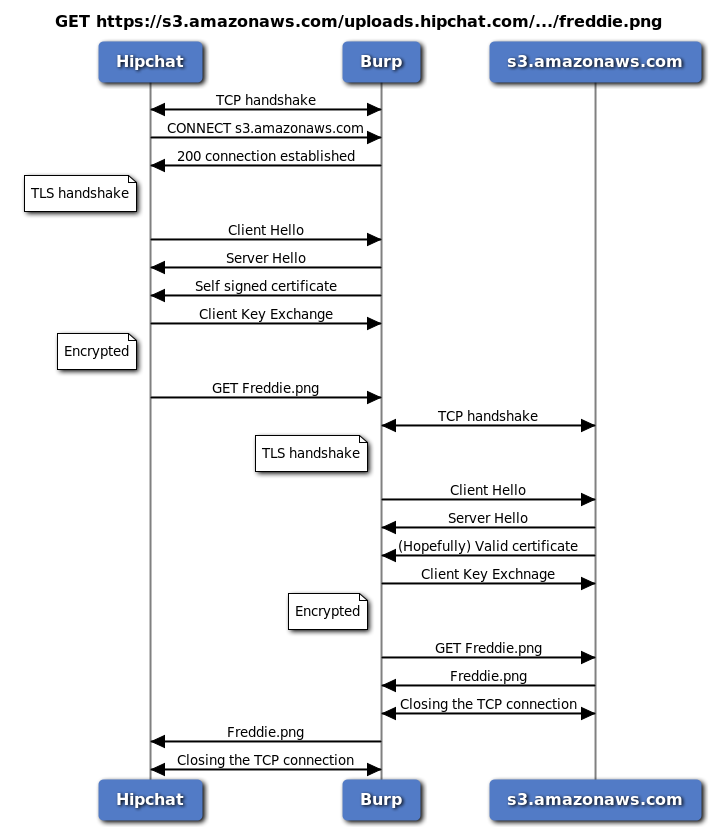 GET Freddie.png sequence diagram
This is very similar to the previous HTTP request. One difference is that Burp will generate its own certificate (signed by its own root Certificate Authority or root CA) for s3.amazonaws.com and present it to Hipchat. Hipchat then checks this certificate for validity and if it is signed by a valid root CA. If you have Burp, you have already added Burp's CA to Windows' certificate store (right?) so this fake certificate will be valid.
2.2.1 What is this CONNECT?
We did not see it last time. This is Hipchat's way of telling the proxy (Burp) about the destination before starting the TLS handshake. In a normal connection everything after the TLS handshake is encrypted (doh) so the proxy does not see anything inside. And lower level data in the packet (e.g. destination IP) do not have this information either because packets are headed for Burp's IP which is 127.0.0.1 (or IP address of Burp). Before a TLS connection is established Hipchat will do send the CONNECT request to tell the proxy (in this case Burp) of the destination where the packets should be forwarded.
Remember that while Burp is a Man-in-the-Middle (MitM) proxy and can decrypt TLS connections, most proxies (especially in corporate environments) are just forwarding proxies so they need this CONNECT to work properly. For example if we did not have this CONNECT request, our SSL pass through in part two would have not worked as Burp was not decrypting traffic for that endpoint. Burp is just forwarding whatever it receives to the destination and does not see the content of requests.
Hipchat is sending this request because it is proxy-aware as we used its option to designate burp as proxy. For non-proxy-aware clients we have to use another one of Burp's capabilities.
2.2.2 Burp's Invisible Proxying
In each blog post we are learning a new Burp thing. It seems like we're becoming quite the Burp expert neh? ;)
If the client is non-proxy-aware and does not send the CONNECT before the TLS handshake (because it doesn't know it is connected to a proxy), Burp needs to know where to send the requests. As Burp is a MitM proxy and is terminating TLS, it can look inside the payloads and determine the destination from the host header. This is called Burp's invisible proxying.
It can be enabled at Proxy > Options. Select the proxy listener, click edit and under Request Handling select Support invisible proxying (enable only if needed).
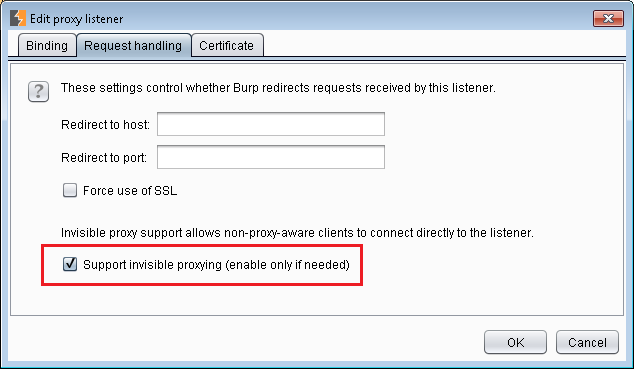 Burp invisible proxying option (enable only if needed!!1!)
3. How does Hipchat Work?
Great, now we (hopefully) have a pretty good idea how MItM proxies work. But before developing our own we must observe Hipchat in its natural habitat to cater to its needs. Let's remove the proxy settings from Hipchat, close it and run it again.
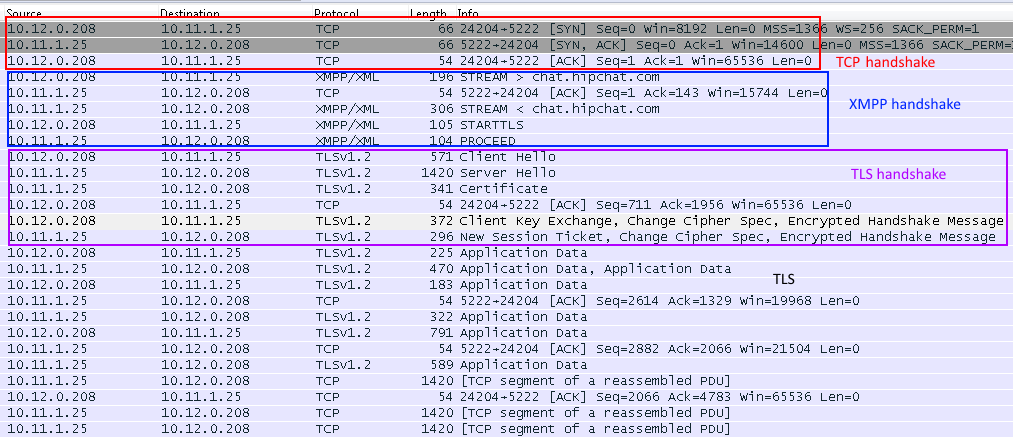 Hipchat normal traffic to the server without Burp
In other words. Click for full-size diagram (I have redacted the name of the Hipchat server because I am lazy):
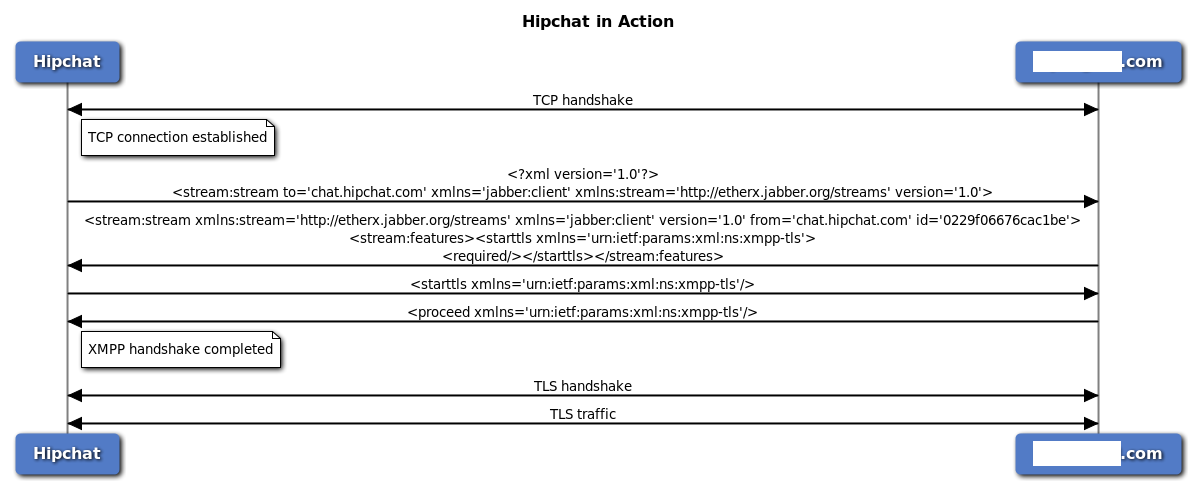 Hipchat in action
In other other words:
- TCP handshake.
- Client starts the XMPP handshake.
- Server responds and indicates that TLS is required.
- Client sends STARTTLS indicating that it is ready to well, start TLS.
- Server responds with PROCEED.
- TLS handshake.
- TLS traffic.
If you remember part two where we proxied the traffic through Burp, it would butcher the first XMPP handshake request and then the server would reset the connection. Now that we have seen how Hipchat works we can create our own proxy.
4. Proxy Design
Let's reiterate what the proxy needs to do:
- Create a TCP socket and start listening on port
5222(Hipchat port). Let's call it the client socket. - When a connection is made, read the first part of XMPP handshake from client.
- Create a TCP connection to hipchatserver.com. Let's call it the server socket.
- Send the message relayed from client to server.
- Read the server's response (2nd part of XMPP handshake) from server socket and relay it back to client. This will contain the
STARTTLSrequirement. - Read the
STARTTLSmessage from client (indicating) that it is ready to start doing TLS and send it to server. - Receive
PROCEEDfrom server and send it to client. - Convert both client and server connections to TLS.
- Read from client socket, decrypt the message and send it to server via the (now TLS) server socket.
- Read from server socket, decrypt the message and send it to client via client socket.
Seems easy enough right? To be honest it is (you were expecting me to say wrong didn't you? :D).
4.1 TLS Certificate Blues
We need to create a TLS certificate for hipchatserver.com to present to Hipchat when we upgrade the connection to TLS. Here's a catch, you can create a self-signed certificate which means that it is signed by itself. Self-signed certificate is also used in a different situation in the field which means an organization is signing their own certificates. In both cases, it means that the certificate is not valid. Hipchat will freak out if you give it a self-signed certificate signed by itself.
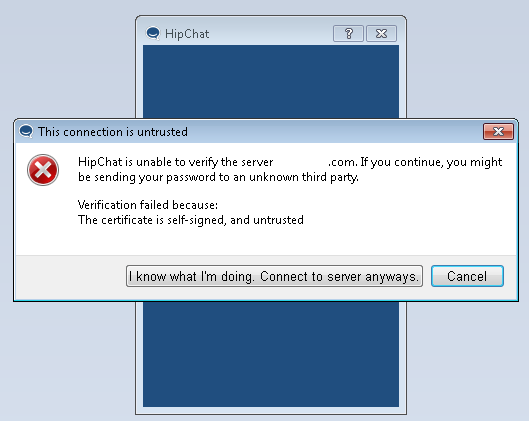 Self signed cert error in Hipchat
Even if you select “I know what I'm doing” and try to proceed, Hipchat will break the connection. So we need to generate our own root CA and sign our certificate with it and finally add this root CA to the list of trusted certificate authorities in Windows certificate store (just like we did with Burp's CA).
4.2 Generating TLS Certificates
I generated my certificates using OpenSSL in Cygwin. First we need to create a pair of RSA keys and then use them to create a root CA.
| |
And you will see something similar to this:
| |
Now we need to create our certificate for hipchatserver.com and then sign it.
| |
| |
Notice that I entered hipchatserver.com for the certificate's Common Name (CN), this is handy in case the client is checking this field against the server. Obviously you should keep the key files secret.
This can also be done on the fly in our proxy but I decided to do it outside to keep it simple. A proxy can discover the endpoint via the CONNECT request and create a certificate for that domain. In a non-proxy aware situation where the CONNECT is not sent, we either have to tell the proxy to create a proxy for a specific endpoint or just present a certificate with a random CN and hope for the best. In Burp we can specify the endpoint manually and/or tell Burp to create a certificate with a specific CN for each proxy listener.
5. Redirecting Traffic from Non-Proxy-Aware Clients
This is another problem. Assuming we are listening on 127.0.0.1:5222 how are we going to redirect Hipchat's traffic to our proxy? We can use Hipchat's proxy configuration to do this but let's not use that because I want to talk about redirecting traffic for non-proxy-aware clients.
We only need traffic to hipchatserver.com all traffic must be redirected to 127.0.0.1 or localhost. On Windows this can be done through the hosts file. Open your favorite text editor as administrator and open it at the following location:
%windir%\system32\drivers\etc\hosts
or
c:\windows\system32\drivers\etc\hosts
Add the following line to the file and save:
127.0.0.1 hipchatserver.com
We could also do it with a kernel driver like WinDivert like we did in [redacted internal proxy tool]. Although the traffic is redirected, the port does not change so our proxy needs to listen on port 5222.
Let's remove proxy settings from Hipchat and we are good to go.
6. HipProxy
Now let's look at our proxy code. Comments should give us enough info.
Remember to copy host.crt and host.key into the directory where the Python code is (or modify their paths in the source code):
| |
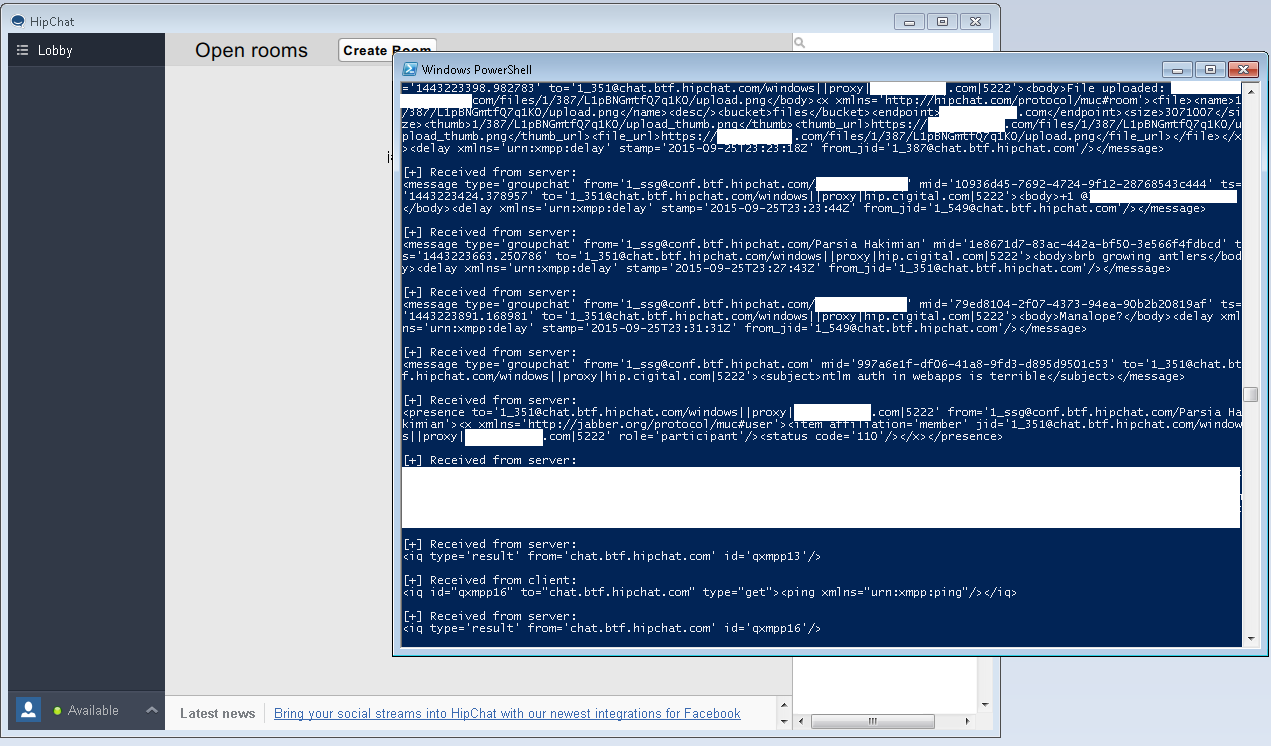 And it works
If you run the proxy, you will see that after the connection is made, server starts sending the whole address book and any messages in all available chatrooms (even if you are not logged into them), after the initial barrage of data from the server, the rest will be mild unless you are in very crowded chatrooms.
The proxy is also slow as it is printing everything to console, I have a different version of it that dumps the traffic to text files named HipProxy-filedump.py. This is a lot faster and allows us to look at the traffic offline. There will be three (almost) text files everything.dump, fromclient.dump and fromserver.dump.
6.1 Connection Juggling
As you saw, I juggled the TLS connections. After both TCP connections were converted to TLS (did you see how easy it was to do it in Python?) both client and server sockets were converted to non-blocking and their timeouts set to 0.5 seconds. At any given time, one socket is receiving and the other is sending. Each socket will send/receive for half a second before timing out and raising an exception (because they non-blocking). Then I caught these exceptions and checked if the exception text contained “timed out.” If this occurs we have not encountered any problems and keep juggling. This method not optimal but is a pretty simple concept and works. We are not transferring large chunks of data and only have two connections.
6.2 Notes about the Python Code
It was really easy, it took me more time to write the blogs (creating good capture files to explain how Burp works took a long time) than to actually do the technical part. Without comments the proxy is less than 50 lines in Python (43 lines to be exact including the file logging lines) so now you know why we use scripting languages. I assume it is going to be as easy in Ruby and whatever Perl is :).
You could say this is not good Python code, fortunately I am not a dev. It does not check for errors, it is not modular and does not work for other programs. But it works for Hipchat and does the job. My main objective was to write to show and explain how a MitM proxy works. With a few hacky modifications you can even inject traffic (I will do it one day).
7. Some Interesting Items
I will probably revisit the proxy later and start analyzing Hipchat's traffic (which is basically XMPP) and modify the proxy to inject traffic. Here are some interesting things that I noted in my cursory look:
7.1 Auth
Open the file fromclient.dump and look at the data sent by the client. The second message is the auth message and is in the following form:
xml <auth xmlns='http://hipchat.com'>some base64 data</auth>
If you decode this base64 blob you can see the following:
0x00username0x00Password0x00windows
7.2 Ian Ate the Hash
XMPP supports using hash functions for integrity checks but in Hipchat we see the value of hash function is set to IANWASHERE. In a normal XMPP message, it contains the name of a hash function and there is a base64 encoded hash (of something):
``xml
Hipchat message
normal XMPP message
7.3 Server's Data Dump at Startup
If you look at the data coming from server, you can see that the server sends the address book (everyone's information) after establishing the connection. We can also see all messages in all accessible chatrooms being downloaded (although I was not logged into any chatroom) perhaps for caching purposes. This is why the connection is so slow at start but stabilizes after a while.
7.4 Cleaning Up
Remember to delete the data dumps as they contain your username and password in plaintext. Also remember to remove the root certificate from Windows' certificate store.
Ok, that was all folks. I hope this is useful, I mean it is. Sooner or later you have to write your own proxy. As usual if you have any complaints, you know where to find me, feedback is always welcome.